
This past April, after leaving one bubble and before joining the next, I found myself deciding to work on some basic electronics, to brush up my down-to-hardware skills and learn new stuff. And since I just had assembled the Lego Bookstore (Birch Books), I thought I would improve on that by adding LEDs and controlling them with a programmed microcontroller.
I’ve been back and forth on choosing which MCU to use, settling on an 8051 clone, which was not entirely straightforward to get to work, but eventually I thought I did. Until I got the actual boards to mount it on, and found out that I couldn’t get any new code on my chips, for some reasons I still haven’t figured out. Instead I decided to take a different approach and use a higher-level programming language and higher-level board, too.
Due to the new job having different set of contribution guidelines, I had to wait a bit before making the new boards and code available, but I have described most of the plans for it in the previous blog post. The code is now dropped in the repository. And I also spent some time to tidy up some of the other boards based on the various bits and pieces I learned from the past few months of trials and error.
The CircuitPython-based implementation relies on either the MCP23016 or the MCP23017 GPIO expanders. The trick for that is that the code is looking for the former at address 32 and the latter at address 33. The pull request to support the older, clunkier ’16 expander is approved but hasn’t been merged yet at the time of writing. I briefly considered making yet another alternative board based on the MCP23018 just to add support for it to the Adafruit library, but… I’ll leave that to someone else for now.
And while I used a Feather M4 to have it working at first, I ended up building the boards to the tinier Trinket M0, which turned out not just to be a good fit for the project, but also a good way to make sure the code would work on more boards. Turns out that on the Trinket, there’s no time.time() and I had to switch to monotonic() instead, and that lead to me finding a bug in CircuitPython.
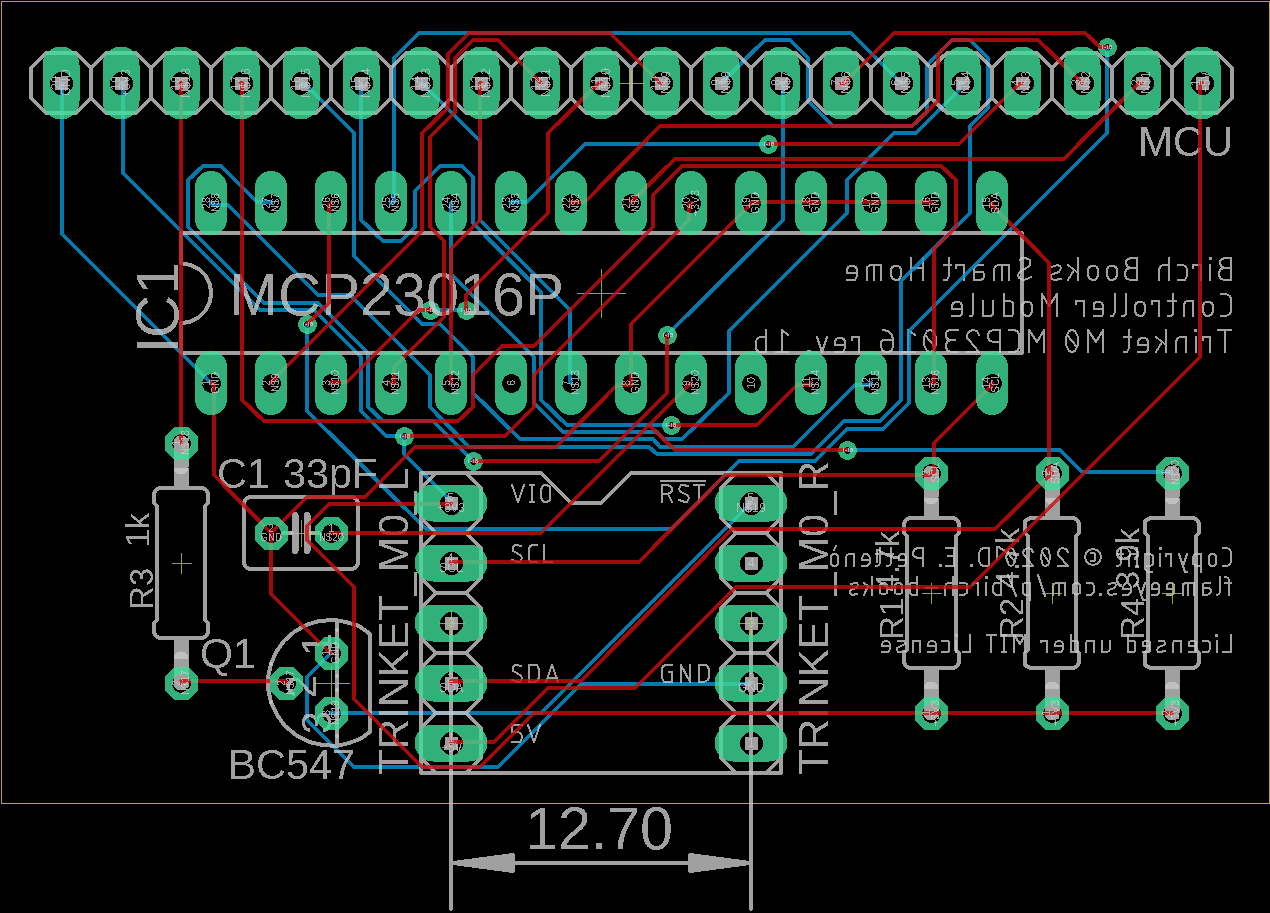

In truth, you can hotwire anything to these boards as long as they have I²C and can talk to the MCP23016/7. And while the connector on them is designed with my actuator board in mind, what it has is pretty much the whole 16 I/O lines coming from the expander. Were you looking for an easy way to connect a Trinket M0 with 16 I/O lines to a breadboard? There you go — you might just have to connect the top header as a male pin header on the bottom of the board. Making an adapter to use this with a Feather would be relatively straightforward.
The (nearly) end result is fairly pleasing:
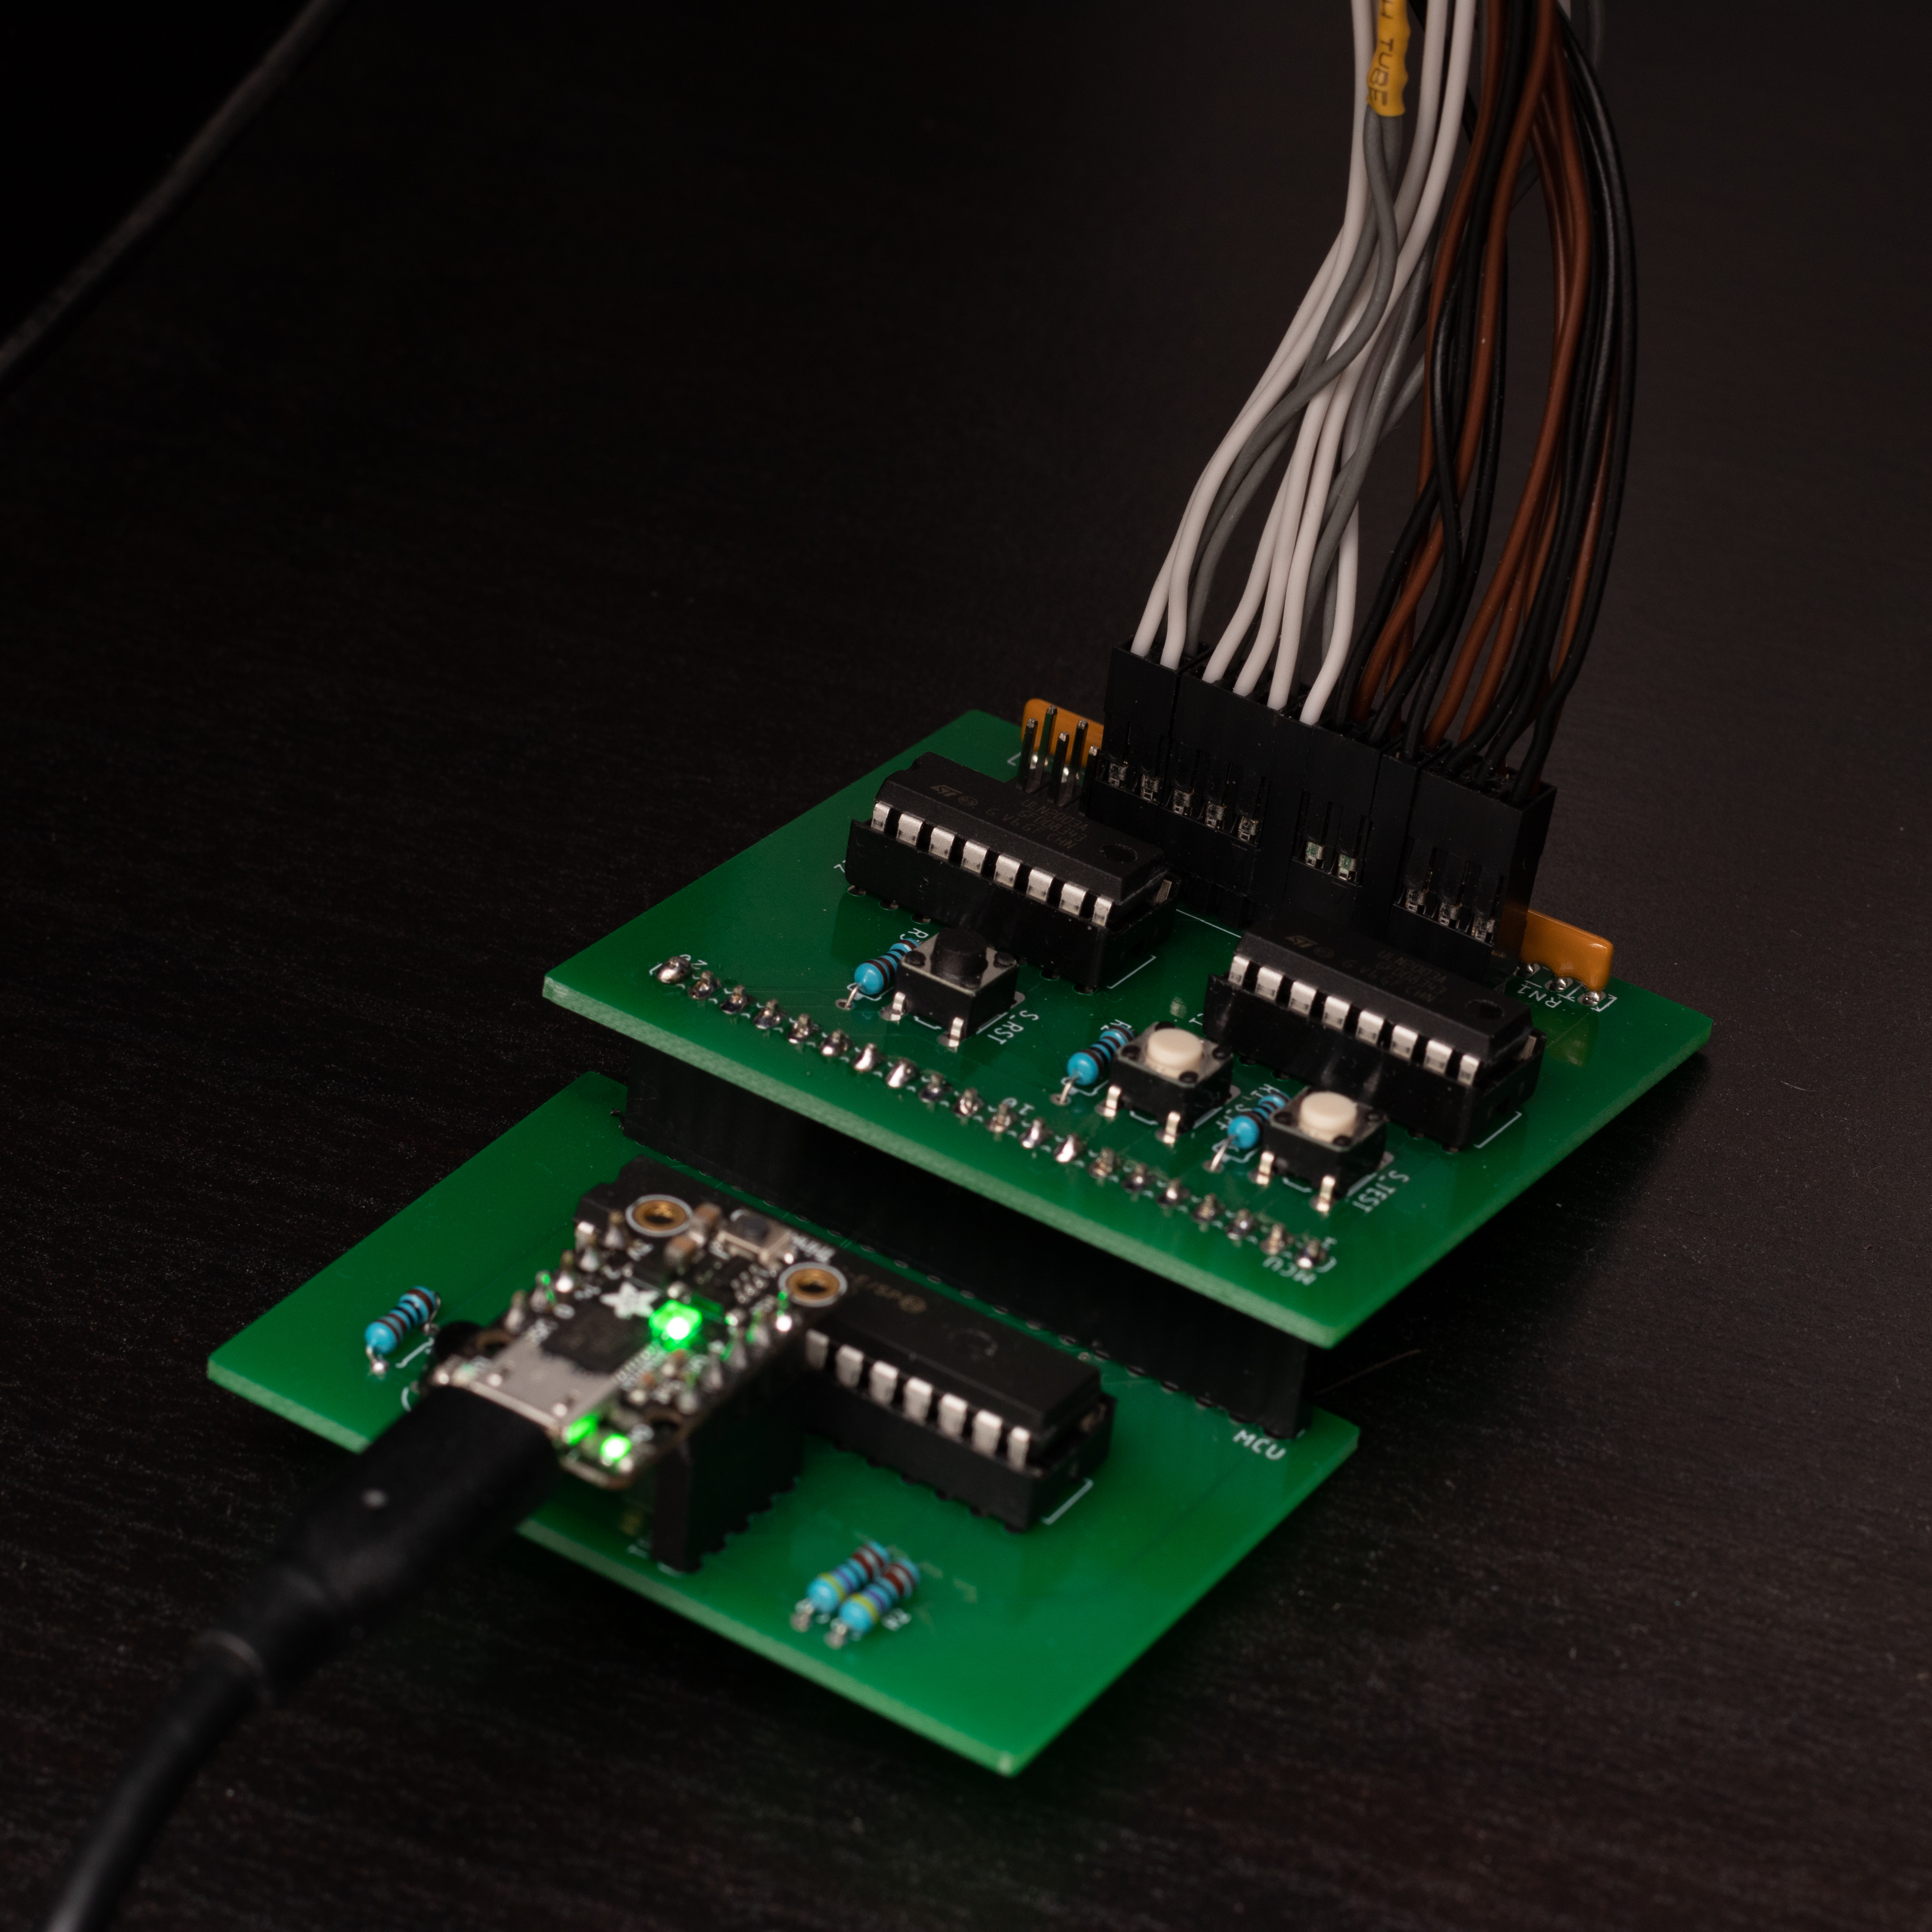
The version you see there is not the most recent design that you’ll find in the repository, but rather the first prototype of this version of the board that, surprisingly, managed to work the first time — nearly. The actuator board needed some work after I set up the Trinket: at first it kept blinking really fast, because it kept going in and out of test mode (which turns on all the LEDs), and in and out of “fast forward” mode (I’ll get to that in a moment). The reason turned out to be that the inputs needed an explicit pull-down. Which is why the new version of the actuator has three resistors to the side of the buttons. I also learnt that I really should pay attention to the orientation of components on the design, since at first I messed up and pulled up one of the inputs constantly.
Let’s talk a moment about the “fast forward” mode. When I originally came to design the inputs for the project, I decided I would want to have a way to run the whole cycle faster, to make videos out of it without needing to use a time-lapse or something like that. This turned out to be a good idea for testing, as well. But it’s implemented in fundamentally different ways between the 8052 firmware and its CircuitPython counterpart.
In the 8052 version, the time is kept as a number of ticks increased by a timer interrupt. When the fast-forward mode is engaged, instead of adding one tick per interrupt, it adds sixty four. Which is the speed up time of the fast forward. It also means that fast-forward works similar to a fast-forward on an old cassette tape, as it speeds up time while pressed, but it starts and end with normal time.
In the CircuitPython version, the “virtual hour” (as in, which scene we’re at) is wholly dependent on the monotonic time since start up, and the fast forward mode just changes the divisor between real time and virtual time. Which means that pressing fast-forward completely changes the virtual time. Oops. I couldn’t find a decent way around that that would have made the firmware overly complicated, so I pretty much gave up.
On the bright side, since I already have a repository for flame effect code for CircuitPython, it might be a good time for me to include the design for the fireplace, since it should be trivial to do so with the boards as they are right now!
Overall, I’m fairly happy with the result, although it feels less “self-contained” than I originally planned. I was honestly afraid at first that the Trinket M0 would be more power-hungry than the STC89, but it might be the opposite. Indeed I’m now having some issues with at least one one of the LEDs that I put in the bookstore being “burned down” — I fear my current limiting calculation was too tied to the STC89, as noticed when the ground floor LEDs turned out to be much brighter than with the breadboard. I need to make sure I got my numbers right — and if I need to, I have some new, fancier LEDs I can install, although those were rated for 12V, in which case I might need some rethinking of the whole setup.
Now to wrap this up a few words about this whole experience: I have worked on hardware before, but never down to this level. I have worked on firmware for very tiny systems that go into HVAC control planes, and for bigger systems built with COTS components but treated and sold as embedded solutions. But the closest to anything like this for me has been high school, which is over fifteen years ago!
This journey has been a learning experience, and I want to thank the folks over on the Adafruit Discord server. I also welcome any comment and critique on the code or the board designs — the latter particularly because I really have no idea what I was doing, and I had to improvise.
I also want to keep talking about mistakes as I make them, and even wonder out loud when I think I did something wrong, for two reasons: first of all, as I just said, I welcome more critiques of my thought process — if I’m going around something the wrong way, please let me know. The second reason is a bit more “squishy”: while making these mistakes is a sure way to learn more, they are not cheap mistakes. Ordering another set of five prototypes is around £5, but then you need to batch a few and spread over the shipping costs, plus the “bill of materials” tend to add up, even if the single components are just a few cents. I hope I’ll be saving someone else’s money when they look around to “how did someone else do this for this stuff?”