
As you may know if you read this blog, I have insulin-dependent diabetes. In particular, I use both fast and long acting insulin, which basically means I need to take a shot of insulin every morning (at around the same time, but there’s at least a bit of leeway around it).
This is not usually a problem: the routine of waking up, getting ready to leave, making a coffee and either drinking it or taking it with me makes it very hard to miss the step “taking the insulin”. Unfortunately, like for many others, this routine is gone out of the window due to the current lockdown. Maybe a bit worse for me since I’m currently still between jobs, which means I don’t even have the routine of logging in to work form home, and of meetings.
What this meant, is that days blurred together, and I started wondering if I remembered to take my insulin in the morning. A few too many times that answer was “I don’t know”, and I think at least twice in the past couple of weeks I did indeed forget. I needed something to make it easier to remember and not to forget.
Because insulin injections tend to be one of those things that I do “in autopilot”, I needed something hard to forget to do. Theoretically, the Libre App allows annotating that you took long-acting insulin (and how much) but that requires me to remember to scan my sensor right after and write down that I did. It’s too easy to forget. I also wanted something that would be a lot more explicit about telling me (and my wife) that I forgot to tell my insulin. And hopefully something that I wouldn’t risk telling I took my insulin too soon in the interaction, and then not actually doing the right thing (as sometimes I reach out for my insulin pen, realise there’s not enough insulin there, and need to pick up a new one from the fridge).
The Trigger: Yes, I Took My Insulin
The first thing I decided to do was to use the spare Flic Button. I bought Flics last year upon suggestion of Luke, and they actually helped immensely — we have one in the study and one in the bedroom, to be able to turn on the smart lights quietly (in the night) and without bothering with the phone apps. We kept a third one “spare”, not quite sure what to use it for until now. The button fits on the back of the cabinet where I keep my “in use” insulin pen. And indeed, it’s extremely easy and obvious to reach while putting the pen down — as an aside, most European insulin pens fit perfectly on a Muji 3-tier slanted display, which is what I’ve been using to keep mine in.
This is not exactly the perfect trigger. The perfect trigger wouldn’t require an action outside of the measured action — so in a perfect world, I would be building something that triggers when I throw an used needle into the needle container. But since that’s a complex project for which I have no obvious solution, I’ll ignore that. I have a trigger, it doesn’t risk getting too much in my way. It should be fine.
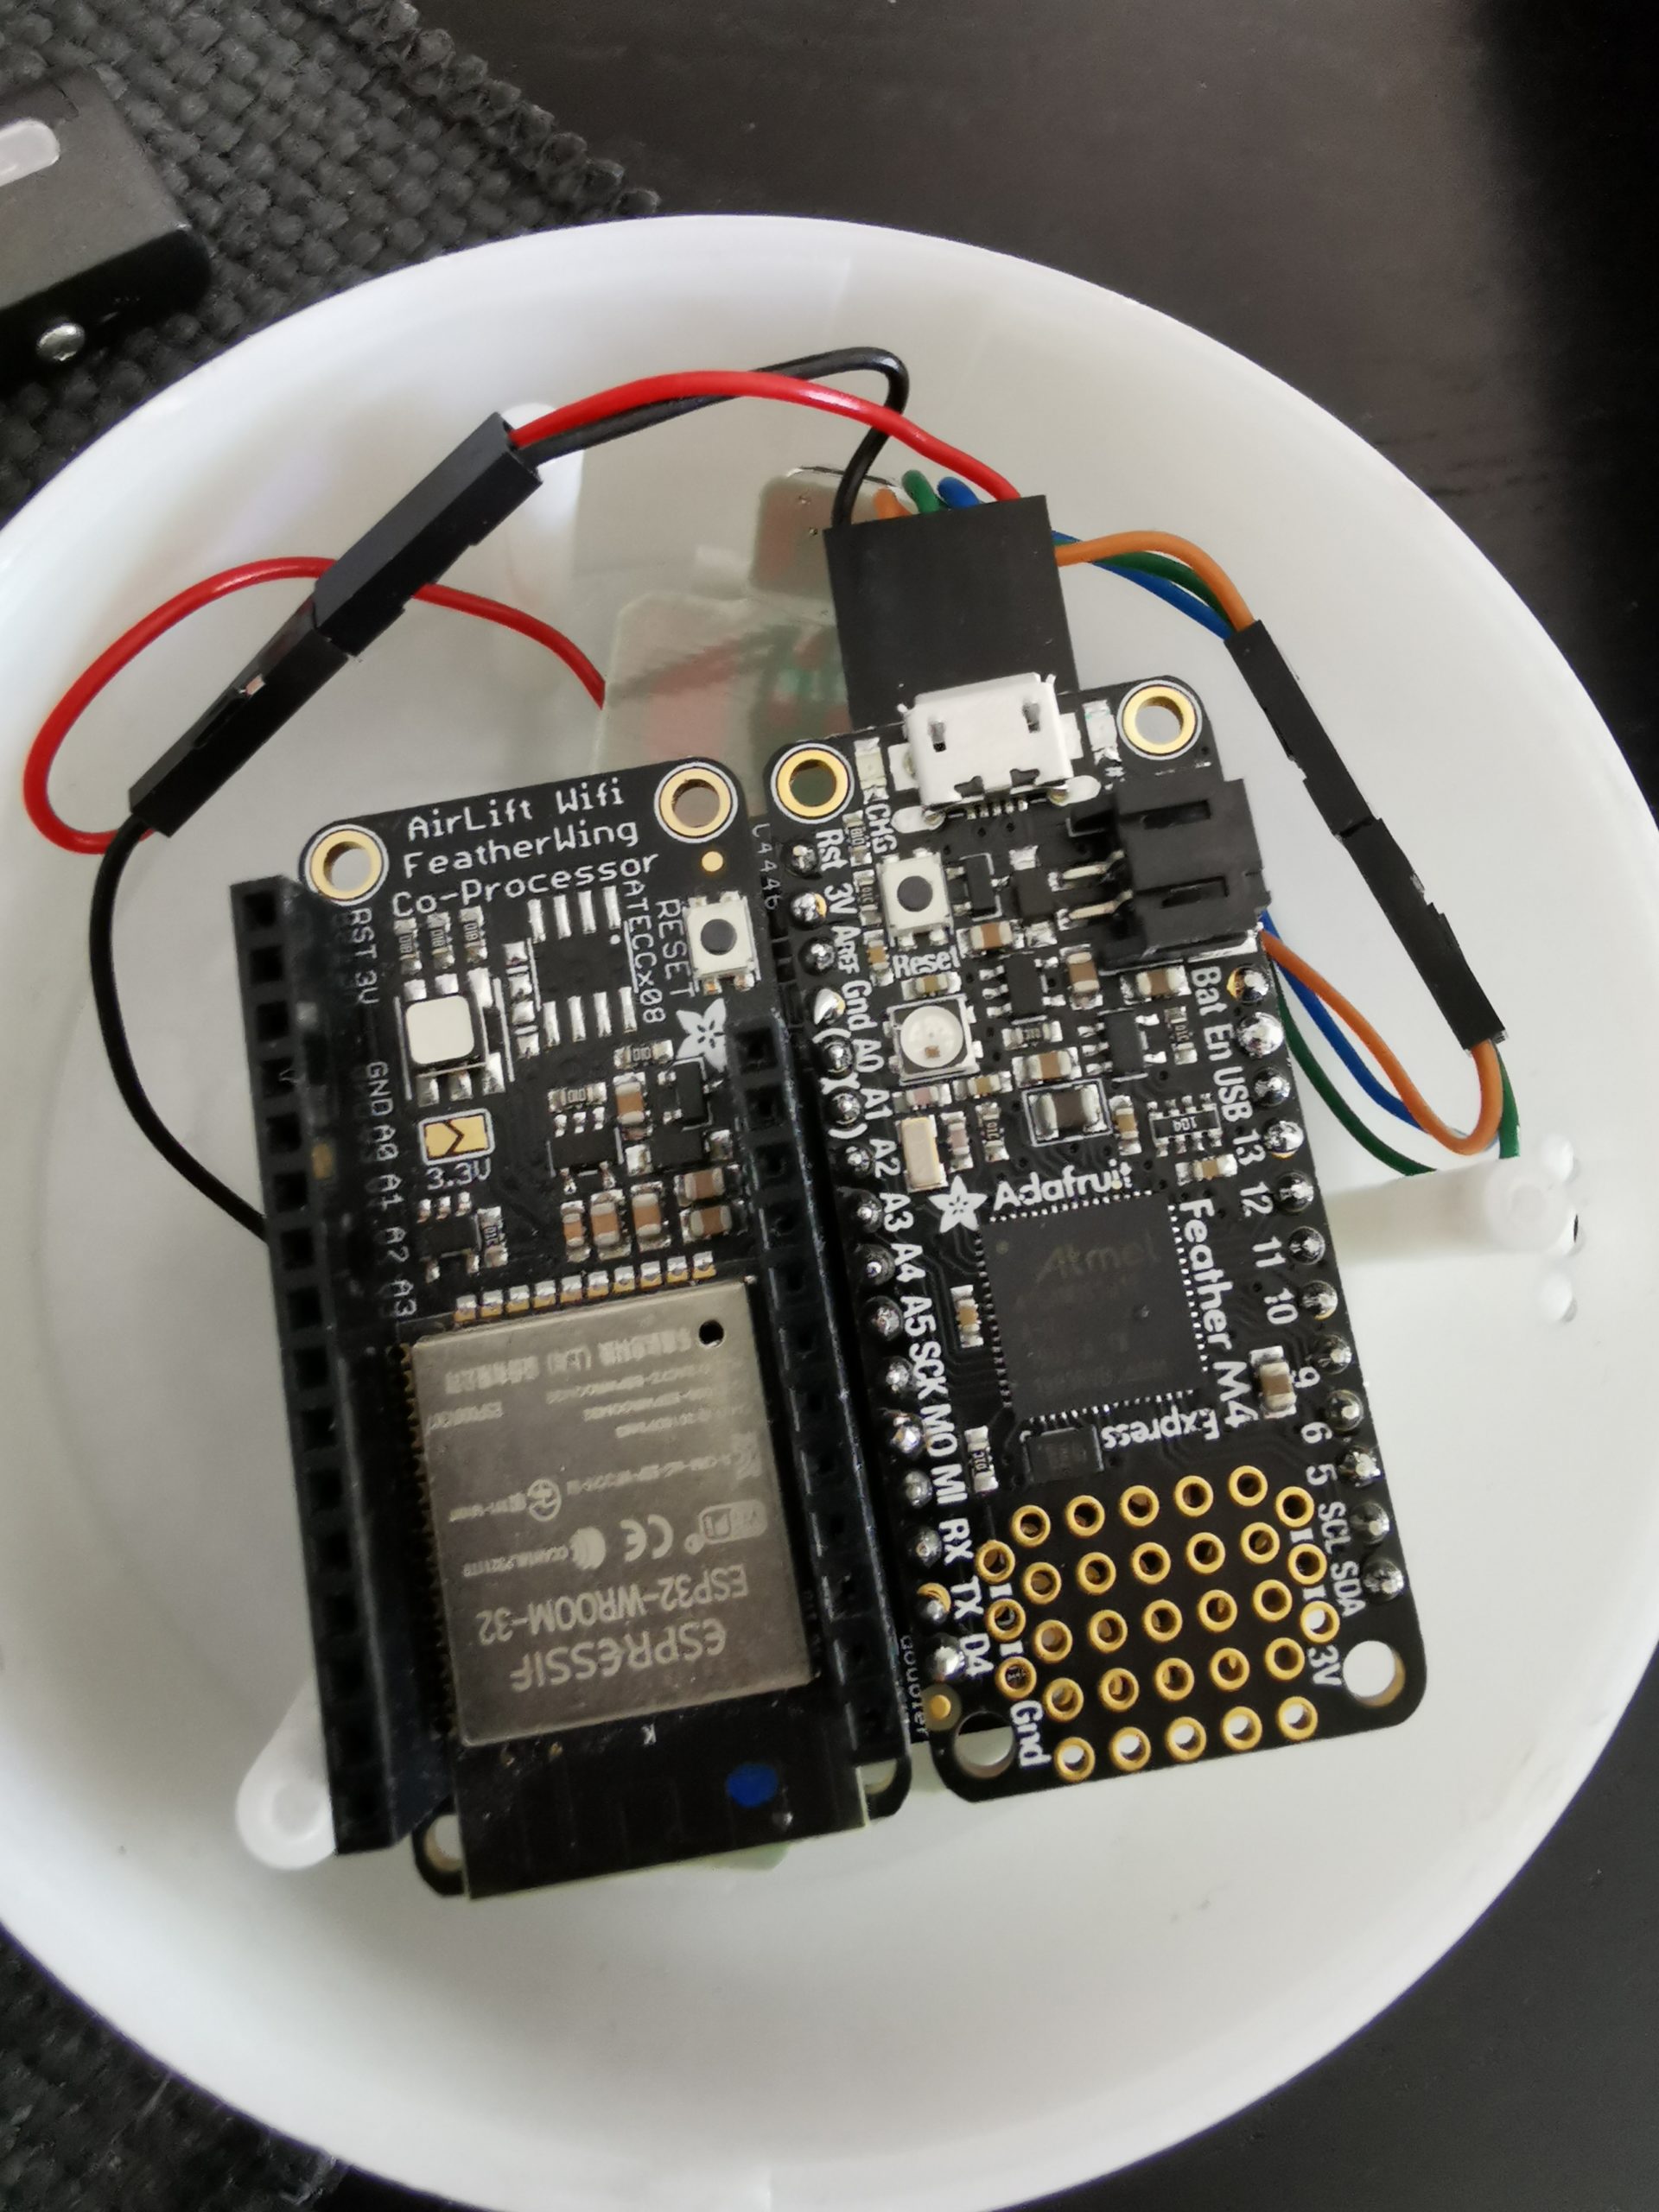
But what should the trigger do? The first idea I had was to use IFTTT to create a Google Calendar event when I pressed the button. It wouldn’t be great for notifying if I forgot the insulin, but it would at least allow me to keep track of it. But then I had another idea. I had a spare Adafruit Feather M4 Express, including an AirLift FeatherWing coprocessor for WiFi. I originally bought it to fix an issue with my TV (which I still have not fixed), and considered using it on my art project, but it also has a big bright RGB LED on it (an AdaFruit NeoPixel), which I thought I would use for notifications.
A quick Flask app later, and I had something working — the Flic button would hit one endpoint on the web app, which would record me having taking my insulin, while the Feather would be requesting another endpoint to know how to reconfigure the LED. The webapp would have the logic to turn the LED either red or quiescent depending on whether I got my insulin for the day. There’s a bit of logic in there to define “the day”, as I don’t need the notification at 1am if I have not gone to bed yet (I did say that my routine is messed up didn’t I?) but that’s all minor stuff.
The code for the webapp (Python, Flask) and the Feather (CircuitPython) I pushed to GitHub immediately (because I can), but there’s no documentation for it yet. It also doesn’t use the NeoPixel anymore, which I’ll explain in a moment, so you may not really be able to use it out of the box as it is.
For placement, I involved my wife — I want her to be able to tell whether I didn’t take my insulin, so if I’m having a “spaced out day”, she can remind me. We settled for putting it in the kitchen, close to the kettle, so that it’s clearly visible when making coffee — something we do regularly early in the morning. It worked out well, since we already had an USB power supply in the kitchen, for the electric cheese grater I converted.
Limitations of the Feather Platform.
The Feather platform by itself turned out to be a crummy notification platform. Don’t get me wrong, the ease of using it is extremely nice. I wrote the CircuitPython logic in less than an hour, and that made it very nice. But if you need a clear LED to tell you whether something was done or not, you can’t just rely on the Feather. Or at least not on the Feather M4 Express. Yes it comes with a NeoPixel, but it also comes with two bright, surface-mount LEDs by the sides of the USB connector.
One of the two LEDs is yellow, and connected to the optional LiPo battery charging circuitry, and according to the documentation it’s expected to “flicker at times” — as it turns out, it seems to be continuously flickering for me, to the point at first I thought it was actually the RX/TX notification on the serial port. There’s also a red LED which I thought was just the “power” LED — but that is actually controlled by a GPIO on the board, except it’s pulled high (so turned on) when using the AirLift Wing.
The battery charging LED does appear to behave as documented (only at times flickering) on the M0 Express I ended up getting in addition to the M4. But since that is not compatible with the AirLift (at least using CircuitPython), it might just be that this is also a side-effect of using the AirLift.
Why am I bringing up these LEDs? Well, if you want a notification light that’s either red-or-off, having a bright always-on red LED is a bad idea. Indeed, a day after setting it up this way, my wife asked me if I took my insulin, because she saw the red light in the corner. Yeah it’s too bright — and easy to confuse for the one that you want to check out for.
My first reaction was to desolder the two LEDs — but I have hardly ever desoldered SMD components, and I seem to have fallen for the rookie mistake of trying to desolder them with a solder iron rather than a hot air gun, and actually destroyed the microUSB connector. Oops. A quick order from Mouser meant I had to wait a few days to go back playing with the Feather.
A Better, Funnier Light
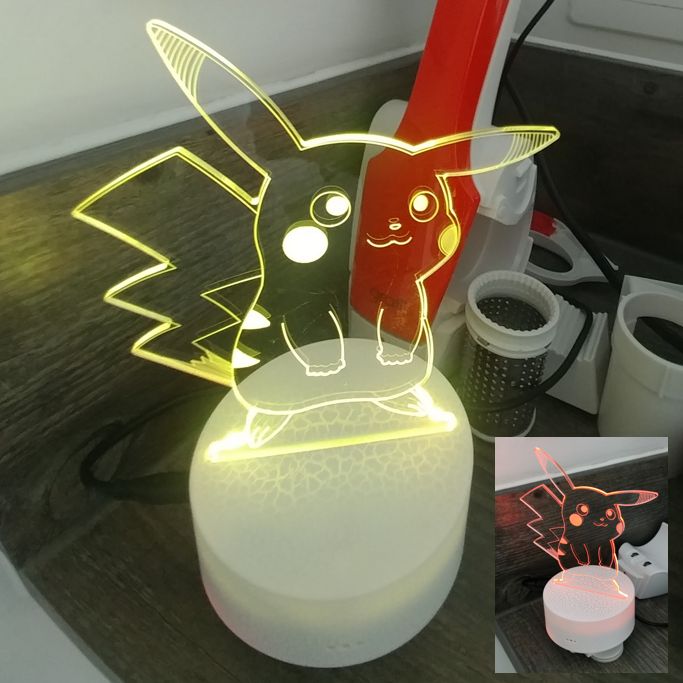
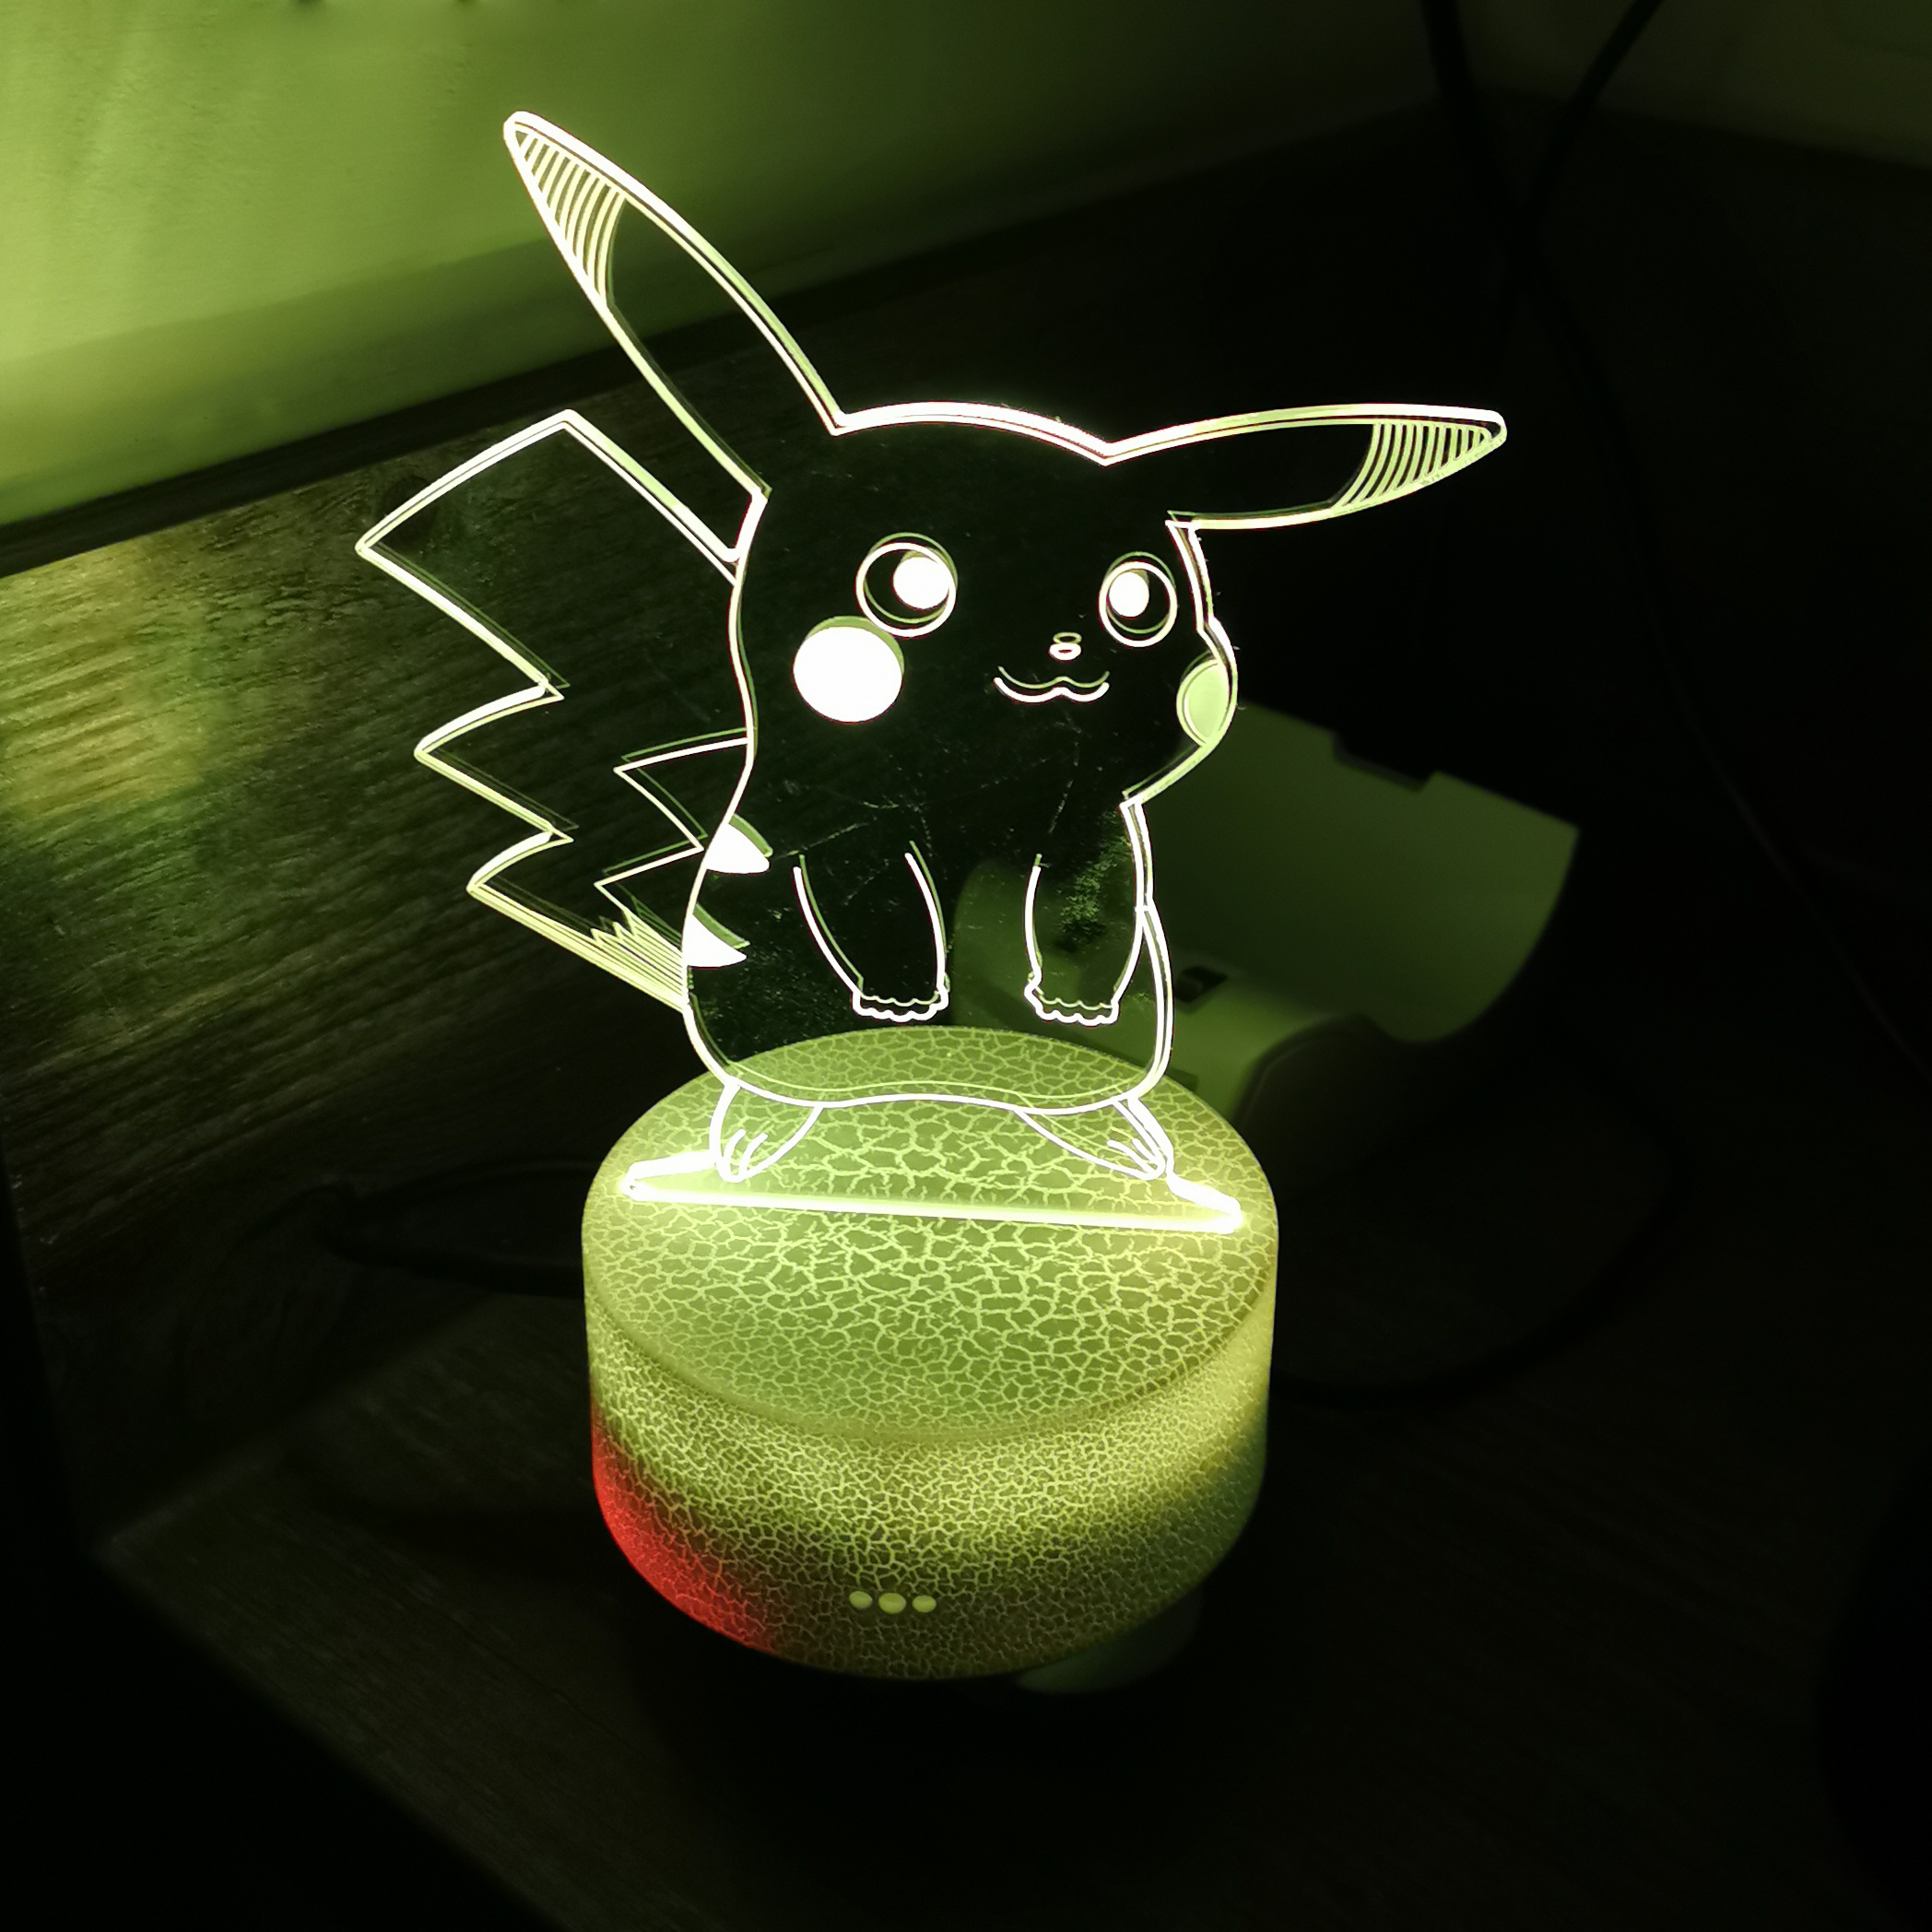
This turned out to be a blessing in disguise as it forced me to take a few steps back and figure out how to make it less likely to confuse the LEDs, beside trying to glue them down with some opaque glue. So instead, I figured out that there’s plenty of RGB LED lamps out there — so why not using those? I ordered a cheap Pikachu from Amazon, which delivered about at the same time as Mouser. I knew it was probably coming from AliExpress (and, spoilers, it pretty much did — only the cardboard looked like printed for the UK market by a domestic company), but ordering it at the source would have taken too long.
The board inside turned out to be fairly well organised, and it was actually much easier to tap into it than expected — except for me forgetting how transistors work, and bridging to the wrong side of the resistor to try turning on the LEDs manually, thus shorting and burning them. I ended up having to pretty much reimplement the same transistor setup outside of the board, but if you do it carefully, you only need three GPIO lines to control the lamp.
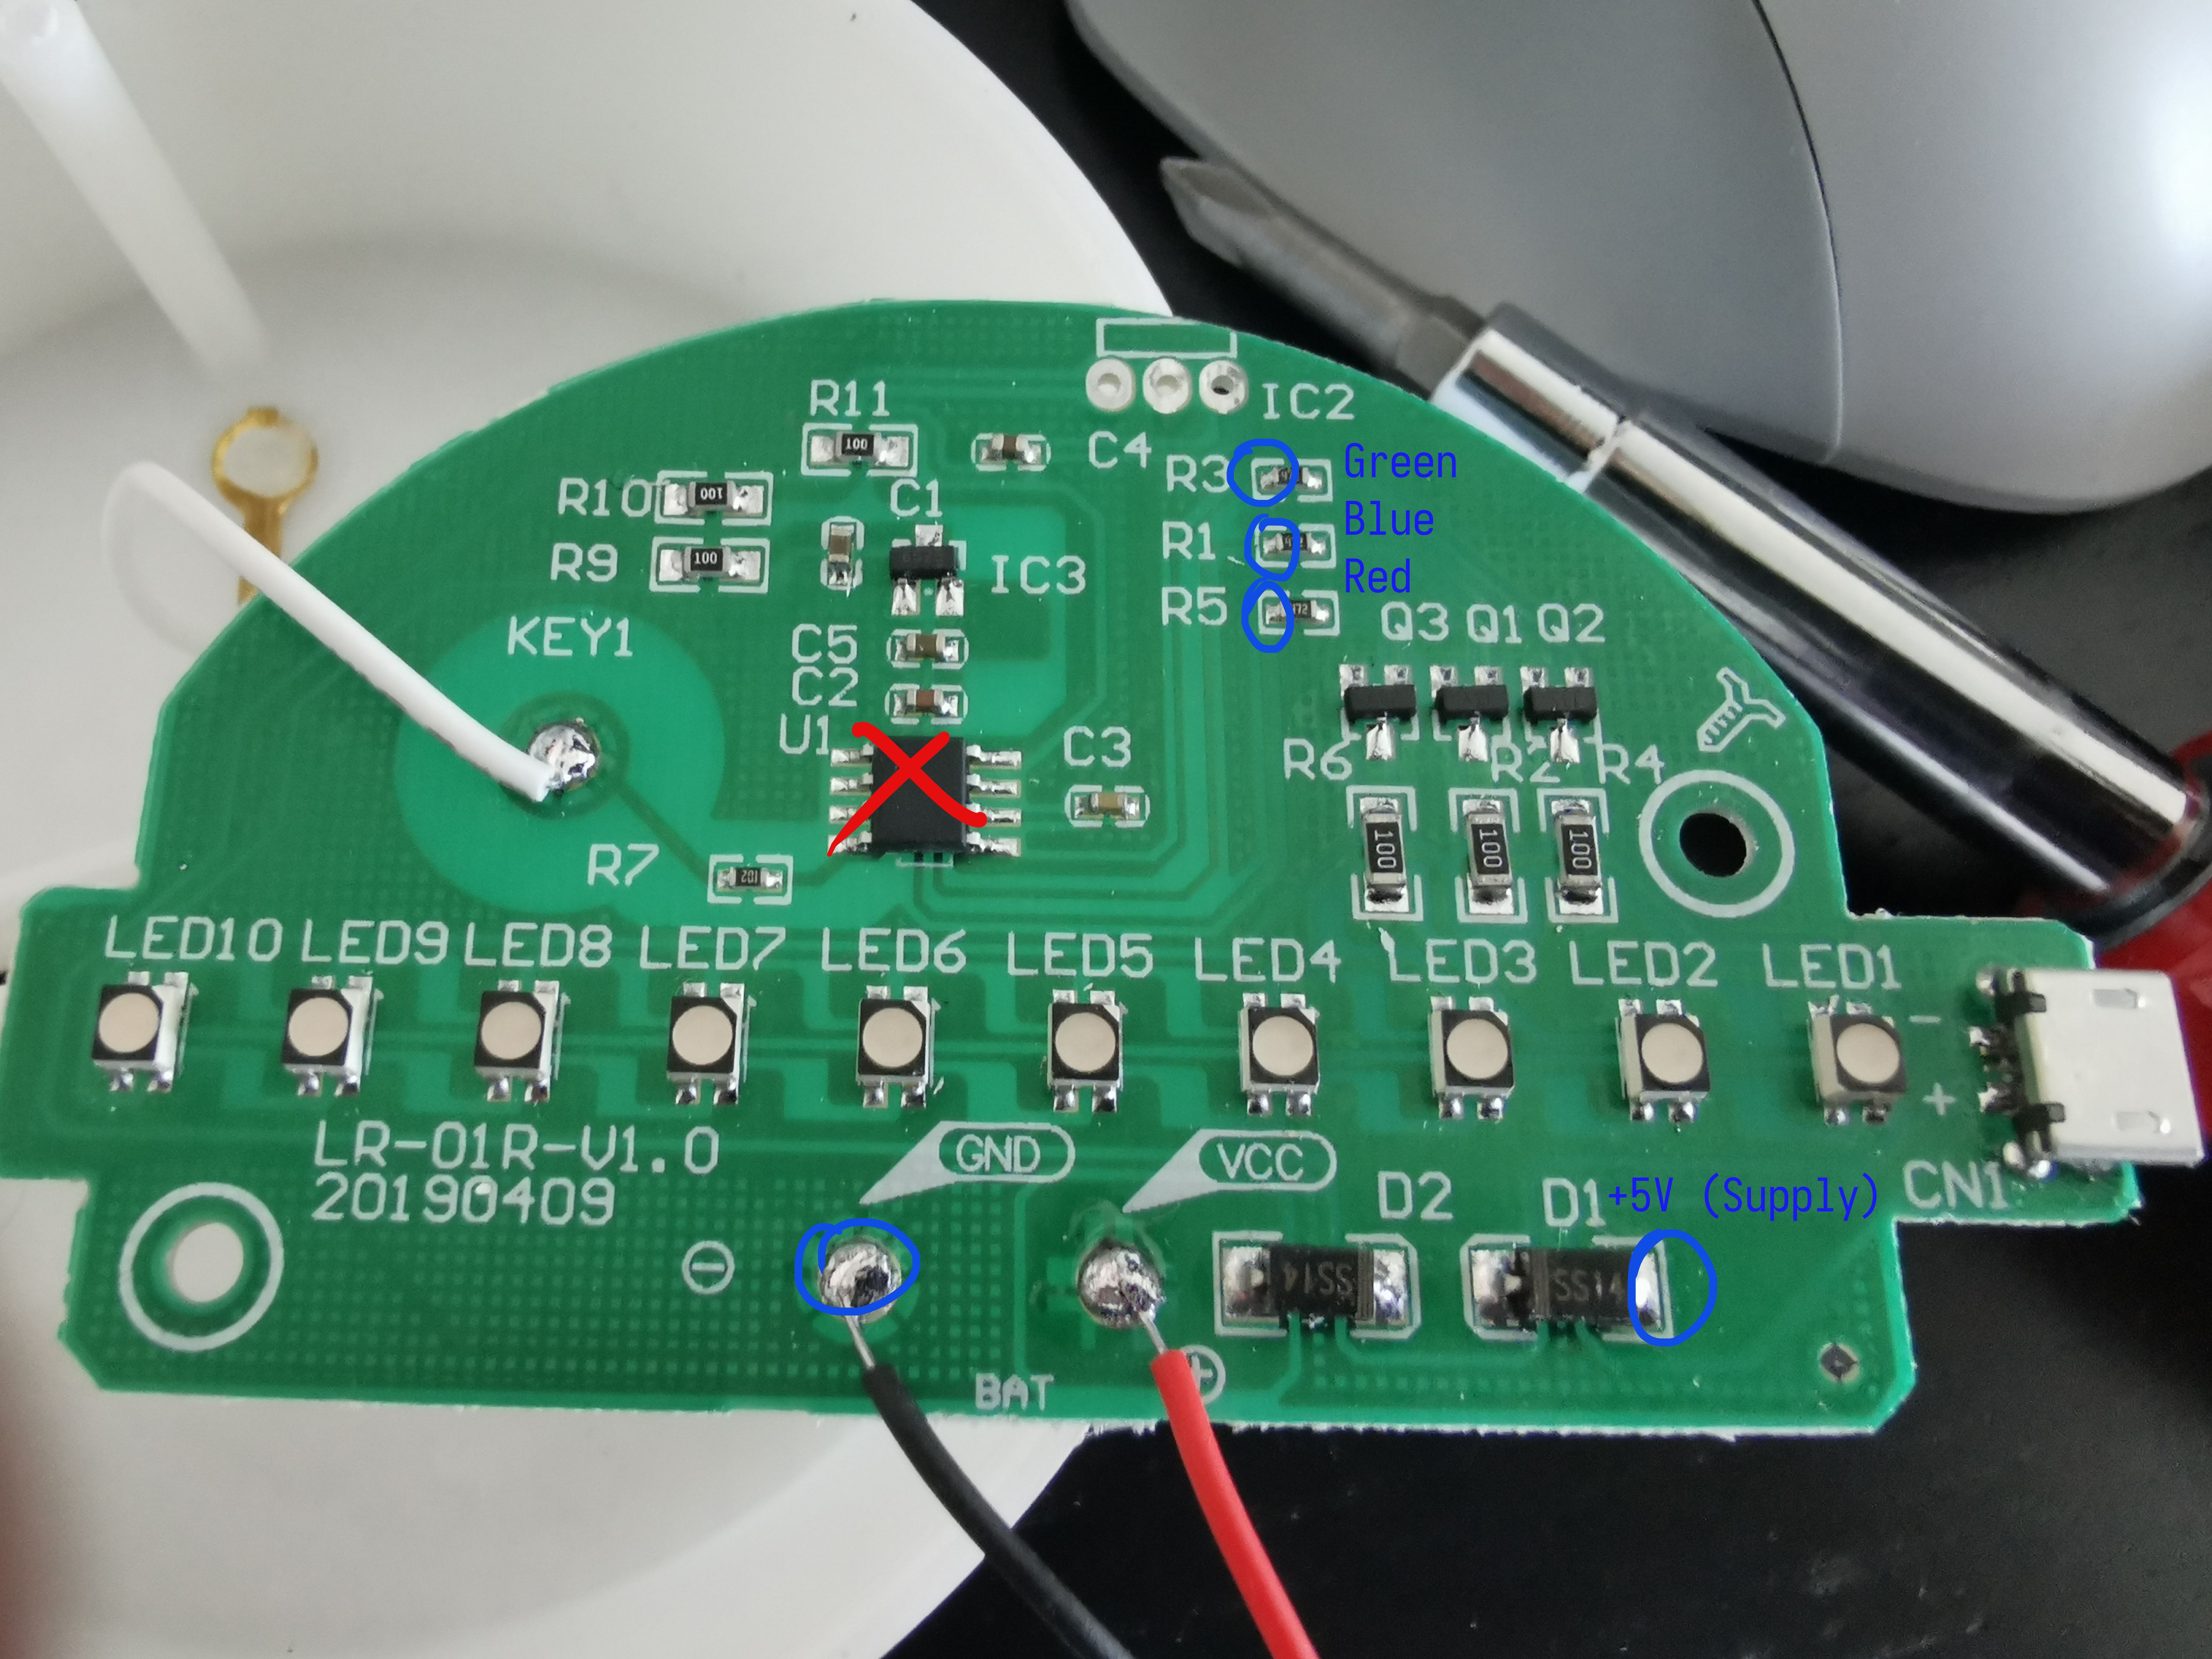
The LED colour can be varied by PWM, which is fairly easy to do with CircuitPython. You only need to be careful with which GPIO lines you use for it. I used “random” lines when testing on the breadboard, but then wanted to tidy it up using lines 10, 11, and 12 on the finalized board — turns out that line 10 does not appear to have timer capabilities, so you can’t actually use it for PWM. And also, lines 11 and 12 are needed for the AirLift — which means the only lines I could use for this were 5, 6 and 9.
At this point, I had to change the webapp so that instead of turning the LED off to signify I took my insulin, it would instead turn the LEDs yellow, to have a bright and happy Pikachu on the kitchen counter. And an angry red one in the morning until I take my insulin.
Of course to be able to put the lamp in the kitchen next to the kettle, I had to make sure it wouldn’t be just a bunch of boards with cables going back and forth. So first of all, I ended up wiring together a Feather Doubler — which allows a feather (and a wing) to sit side-by-side. The doubler has prototype areas in-between the connectors, which were enough to solder in the three transistors and three resistors — you won’t need those if you don’t burn out the original transistors either!
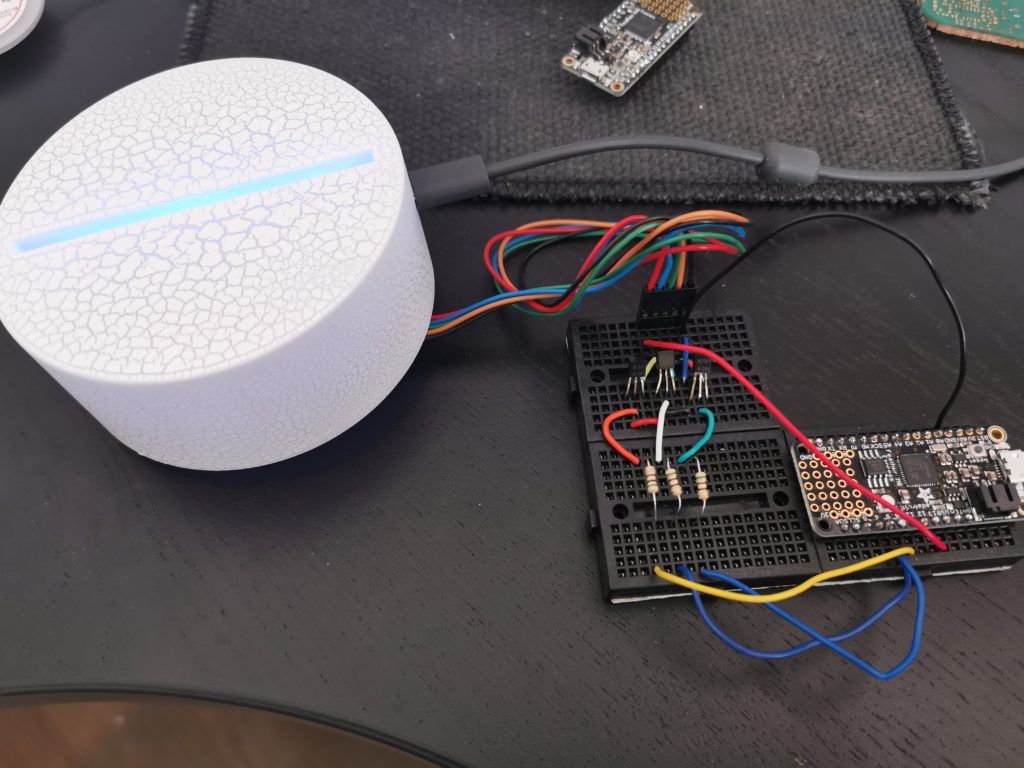

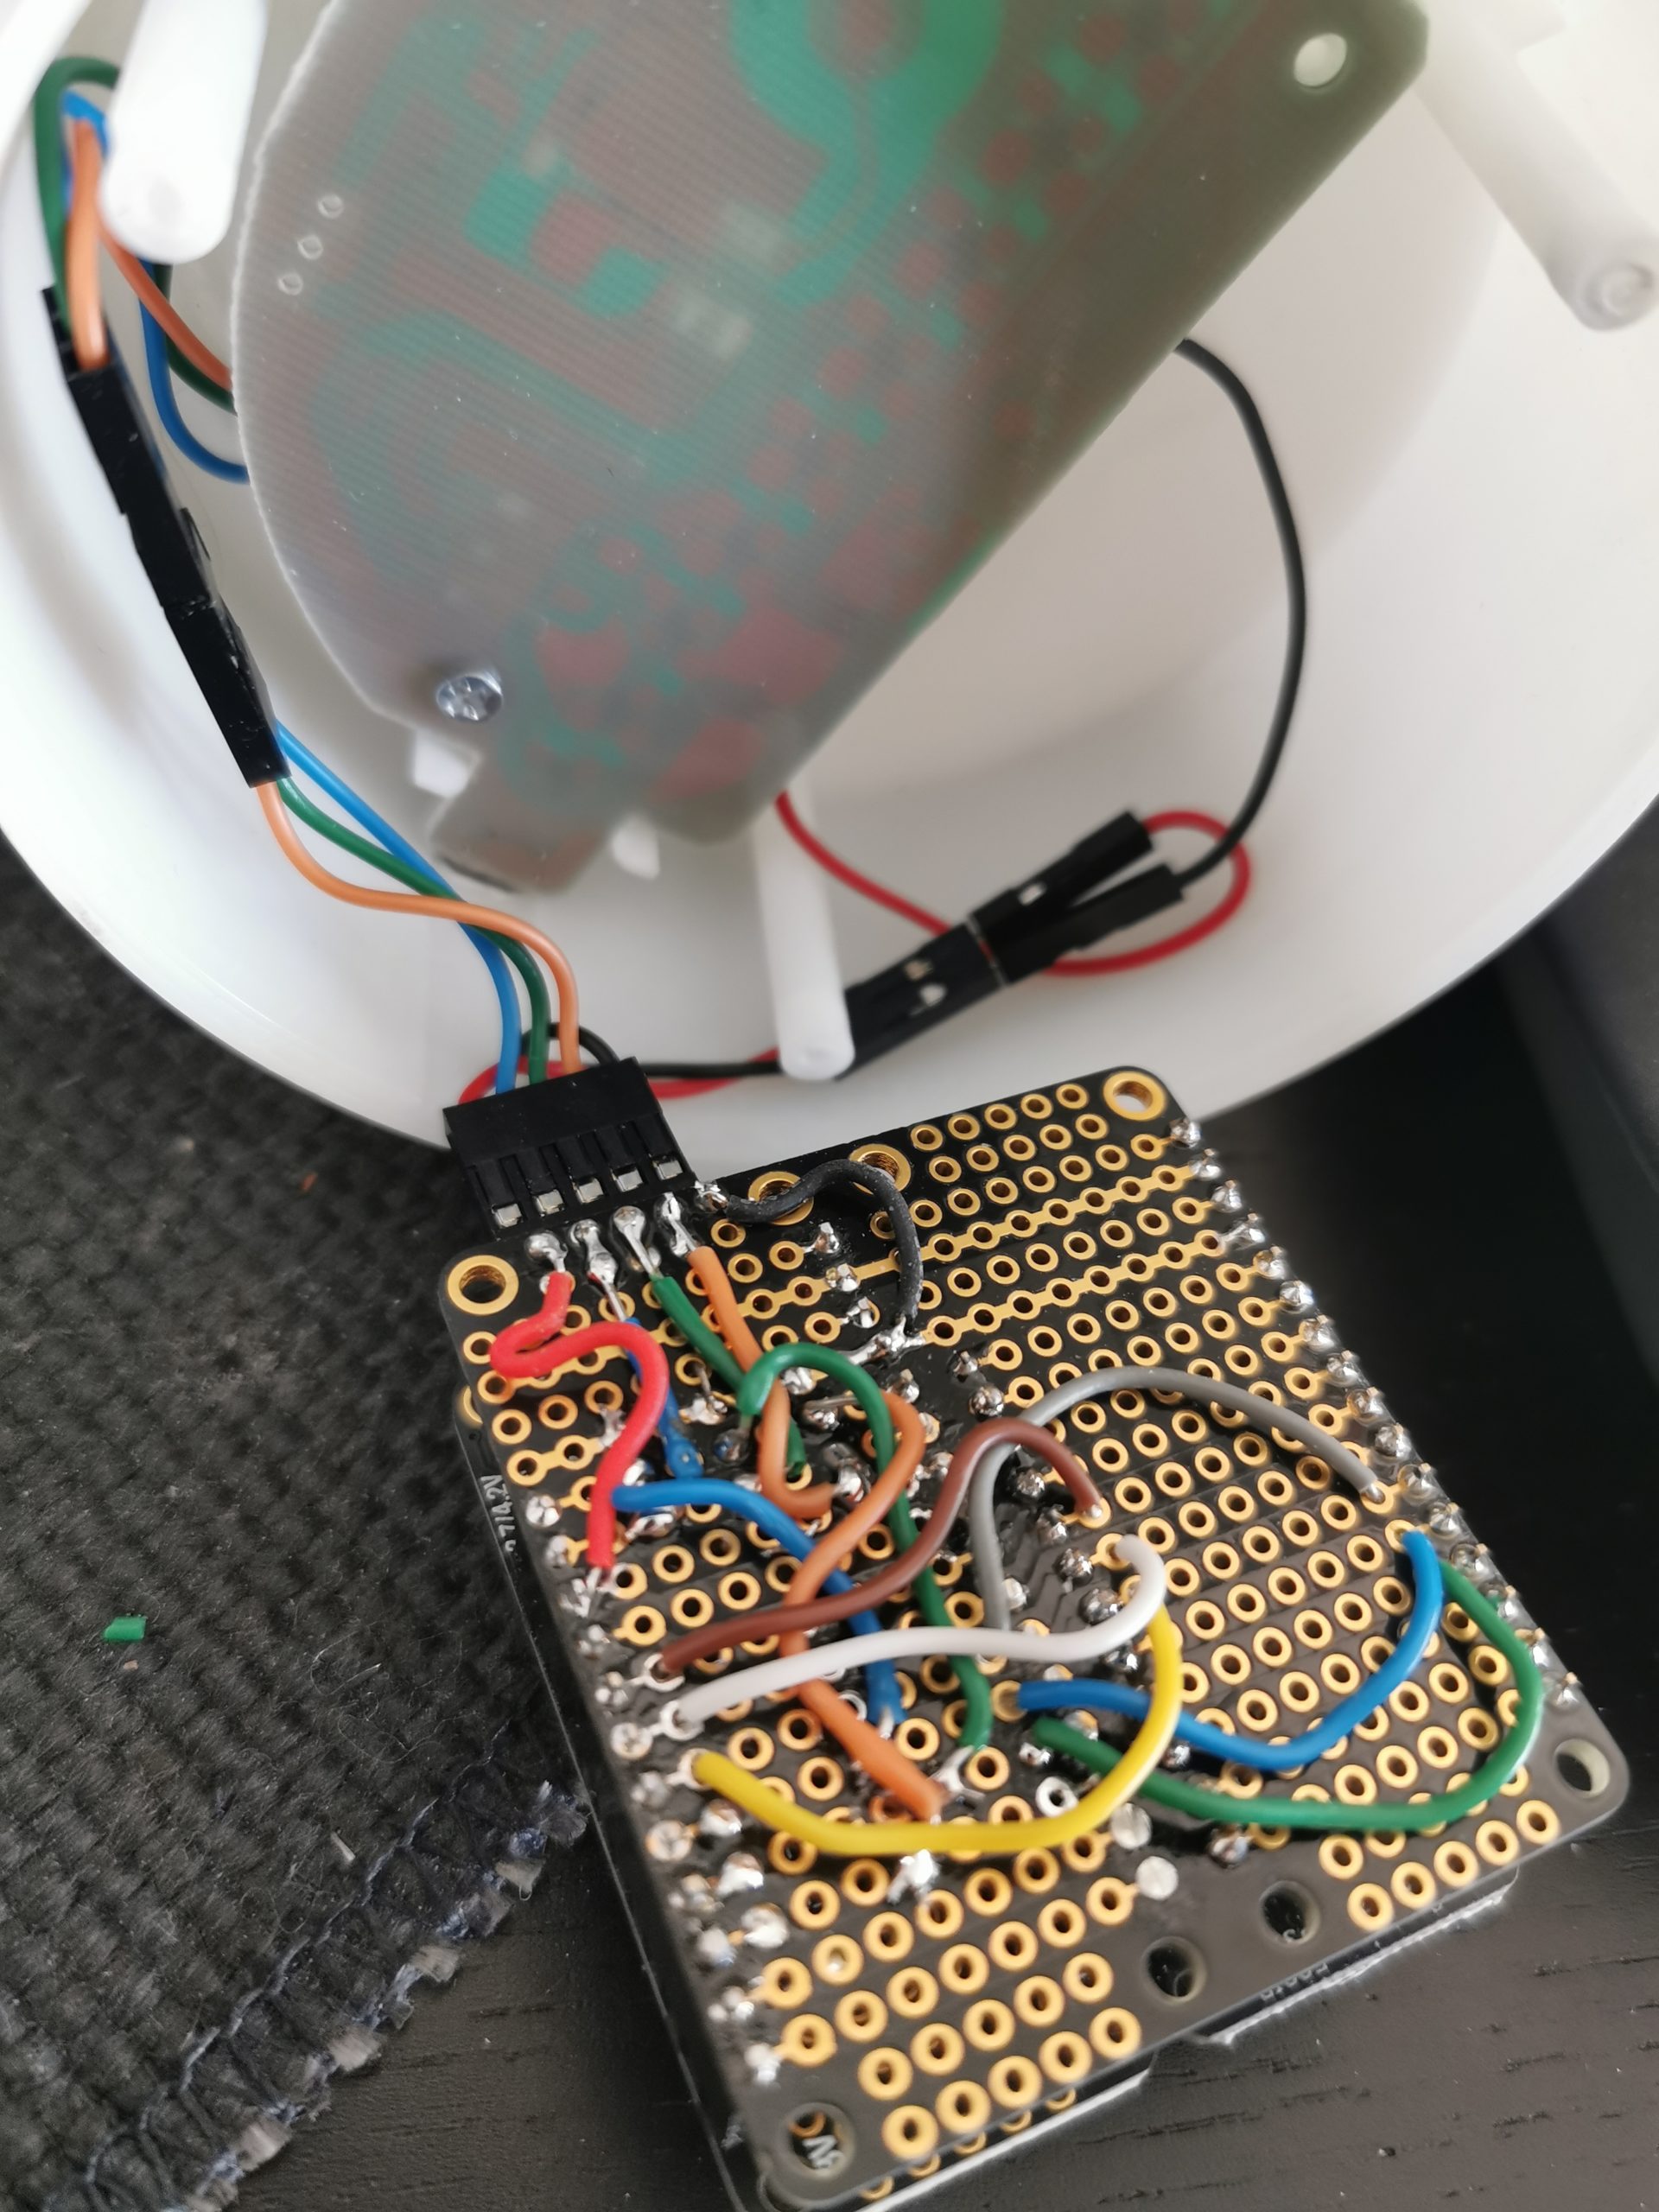
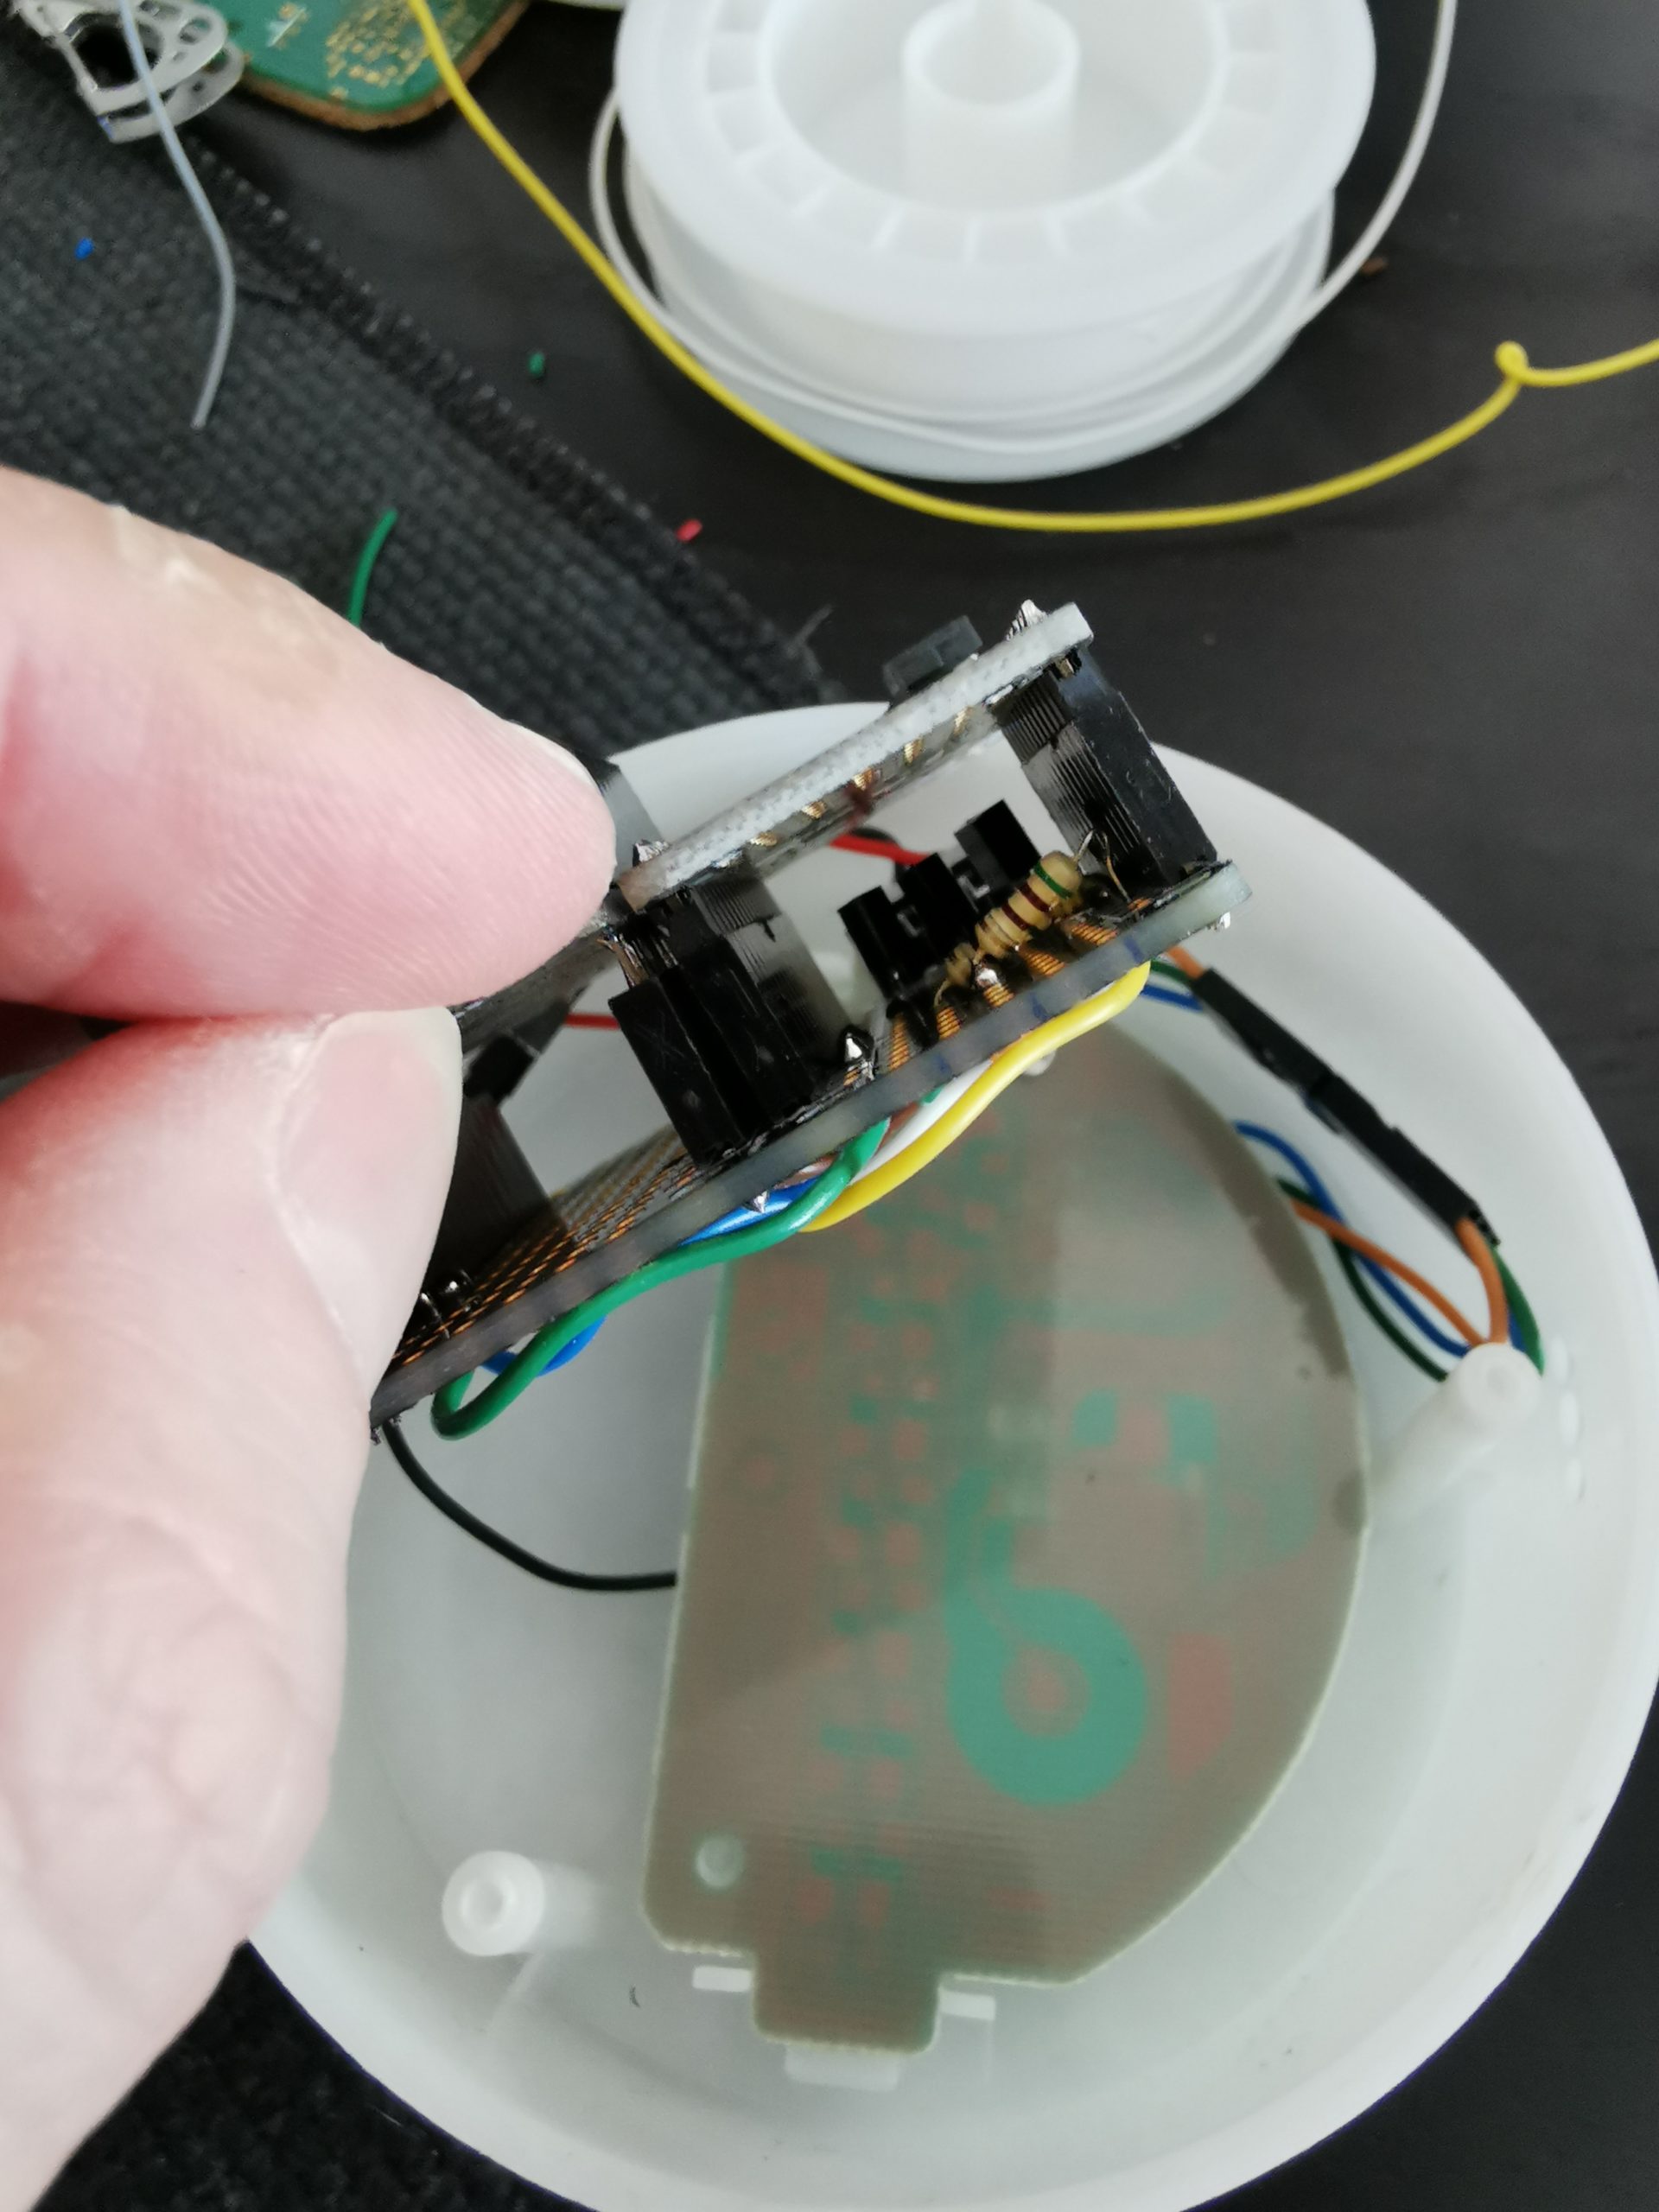
Unfortunately, because I had stacking headers on my AirLift, even with the cover off, the lamp wouldn’t sit straight. But my wife got the idea of turning the cover inside out, using the space provided by the battery compartment, which worked actually fairly good (it requires some fiddling to make it stable, and I was out of Sugru glue to build a base for it, but for now it’ll work).
Following Up: Alternative Designs and Trimmings
So now I have a working notification light. It works, it turns red in the morning, and turns back yellow after I click the button to signal I took my insulin. It needs a webapp running – and I have been running this on my desktop for now – but that’s good enough for me.
Any improvement from here is pretty much trimming, and trying something new. I might end up getting myself another AirLift and solder the simpler headers on it, to make the profile of the sandwiched board smaller. Or if I am to remake this from an original lamp with working transistors, I could just avoid the problem of the doubler — I would only need GPIO wirings, and could use the prototyping space next to the M4 Express to provide the connection.
I did order a few more lamps in different styles from AliExpress — they will take their due time to show up, and that’s okay. I’ll probably play with them a bit more. I ordered one that (probably) does not have RGB LEDs — it might be interesting to design a “gut replacement” board, that just brings in new LEDs altogether. I ordered one that has “two-colour” images, which likely just means it has two sets of LEDs. I’ll be curious to see how those look like.
I also ordered some ESP32-based “devkits” from AliExpress — this is the same CPU used in the AirLift wing as a WiFi co-processor only, but it’s generally powerful enough that it would be able to run the whole thing off a single processor. This might not be as easy as it sounds to prototype, particularly given that I’m not sure I can just provide the 5V coming from the lamp’s connector to the ESP board (ESP32 uses 3.3V), and I burnt the 3.3V regulator on the lamp’s original board. Also since I need the transistor assembly, I would have to at least get a prototype board to solder everything on and — well, it might just not work out. Still nice to have them in a drawer though.
While I don’t have a 3D printer, and I’m not personally interested in having one at home, and I’m also not going into an office, which may or may not have one (old dayjob did, new dayjob I’m not sure), I might also give a try to software to design a “replacement base” that can fit the Feather, and screw into the rest of the lamp that is already there. It might also be a starting point for designing a version that works with the ESP32 — for that one, you would need the microUSB port from the USB module rather than the one present in the lamp, to go through the on-board regulator. This one is just for the craic, as my Irish friends would say, as I don’t expect that to be needed any time soon.
All in all, I’m happy with what I ended up with. The lamp is cute, and doesn’t feel out of place. It does not need to broadcast to anyone but me and my wife what the situation is. And it turns out to be almost entirely based on Python code that I just released under MIT.
This is much prettier than the one I set up to remind me to give the cat shots of Lantus twice a day. For mine, I used an ESP3266, a two-line serial display and a lighted button. Every time I pushed the button it sent the current time to Adafruit.io as MQTT. The display would show the number of days/hours/minutes since the last button press. After 12 hours the light on the button would start blinking. So if the light is blinking, it’s shot o’clock, buddy. If I unplugged or rebooted the device it would read back the last value from Adafruit.io so the timer would still be right. It bought us an extra two years, so no complaints. But it was definitely just a circuit board in a black box with holes cut in it, aesthetically speaking.