As I said in previous posts, I have decided to spend some time reverse engineering the remaining two glucometers I had at home for which the protocol is not known. The OneTouch Verio is proving a complex problem, but the FreeStyle Optium proved itself much easier to deal with, if nothing else because it is clearly a serial protocol. Let’s see all the ducks to get to the final (mostly) working state.
Alexander Schrijver already reverse engineered the previous Freestyle protocol, but that does not work with this model at all. As I’ll say later, it’s still a good thing to keep this at hand.
The “strip-port” cable that Abbott sent me uses a Texas Instrument USB-to-Serial converter chip, namely the TIUSB3410; it’s supported by the Linux kernel just fine by itself, although I had to fix the kernel to recognize this particular VID/PID pair; anything after v3.12 will do fine. As I found later on, having the datasheet at hand is a good idea.
To reverse engineer an USB device, you generally start with snooping a session on Windows, to figure out what the drivers and the software tell the device and what they get back. Unfortunately usbsnoop – the open source windows USB snooper of choice – has not been updated in a few years and does not support Windows 10 at all. So I had to search harder for one.
Windows 7 and later support USB event logging through ETW natively, and thankfully more recently Microsoft understood that those instructions are way too convoluted and they actually provide an updated guide based on Microsoft Message Analyzer, which appears to be their WireShark solution (Update 2021-11-18, as noted last year, the Microsoft Message Analyzer has been decommissioned and removed.) Try as I might, I have not been able to get MMA to provide me useful information: it shows me fine the responses from the device, but it does not show me the commands as sent by the software, making it totally useless for the purpose of reverse engineering, not sure if that’s by design or me not understanding how it works and forgetting some settings.
A quick look around pointed me at USBlyzer, which is commercial software, but both has a free complete trial and has an affordable price ($200), at least now that I’m fully employed, that is. So I decided to try it out, and while the UI is not as advanced as MMA’s, it does the right thing and shows me all the information I need.
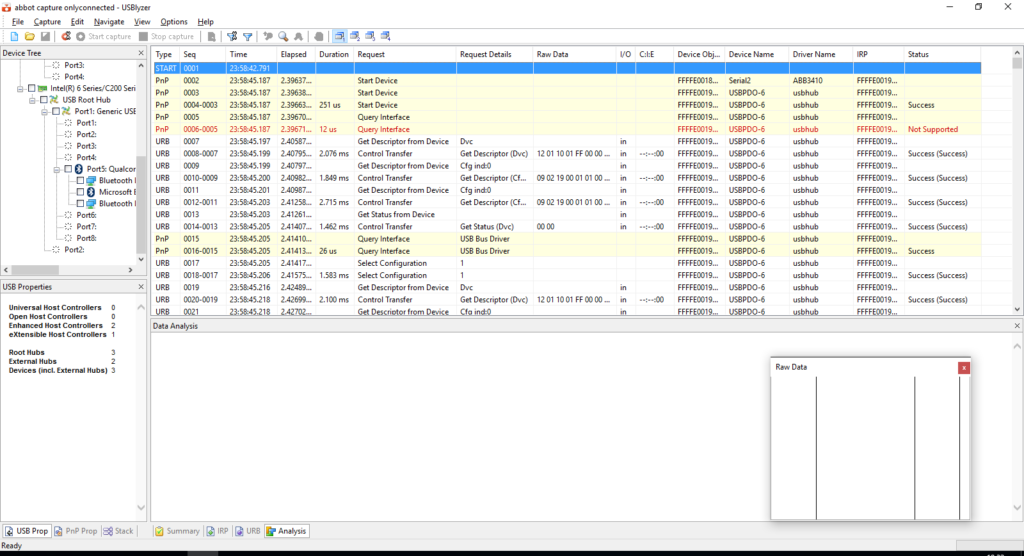
Now that I have a working tool to trace the USB inputs and outputs, I recorded a log while opening the software – actually, it auto-starts – downloading the data, checking the settings and change the time. Now it’s time to start making heads and tails of it.
First problem: TI3410 requires firmware to be uploaded when it’s connected, which means a lot of the trace is gibberish that you shouldn’t really spend time staring at. On the other hand, the serial data is transferred over raw URB (USB Request Block), so once the firmware is set up, the I/O log is just what I need. So, scroll away until something that looks like ASCII data comes up (not all serial protocols are ASCII of course, the Ultra Mini uses a binary protocol, so identifying that would have been trickier, but it was my first guess.
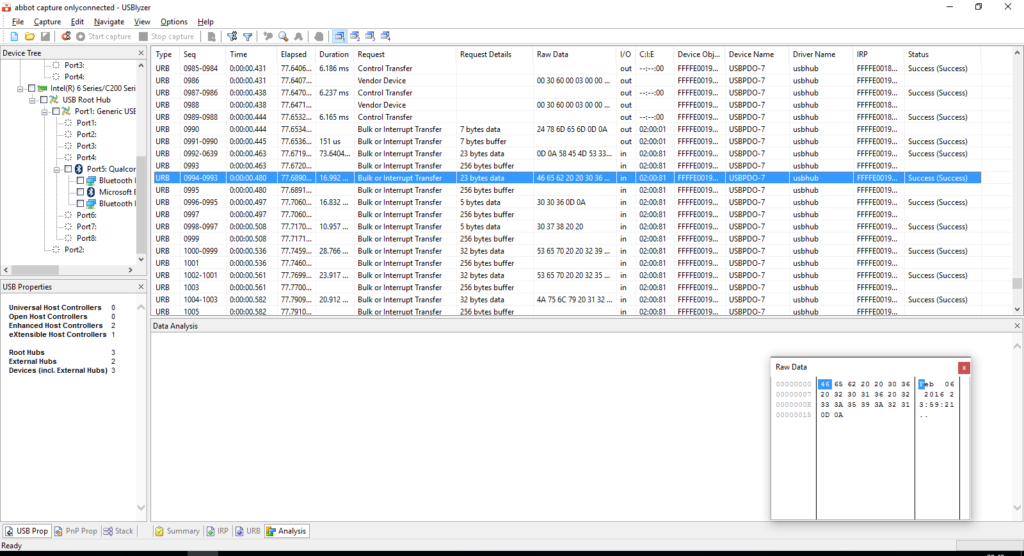
Now with a bit of backtracking I can identify the actual commands: $xmem, $colq and $tim (the latest with parameters to set the time.) From here it would all be simple, right? Well, not really. The next problem to figure out is the right parameters to open the serial port. At first I tried the two “obvious” positions: 9600 baud and 115200 baud, but neither worked.
I had to dig up a bit more. I went to the Linux driver and started fishing around for how the serial port is set up on the 3410 — given the serial interface is not encapsulated in the URBs, I assumed there had to be a control packet, and indeed there is. Scrollback to find it in the log gives me good results.
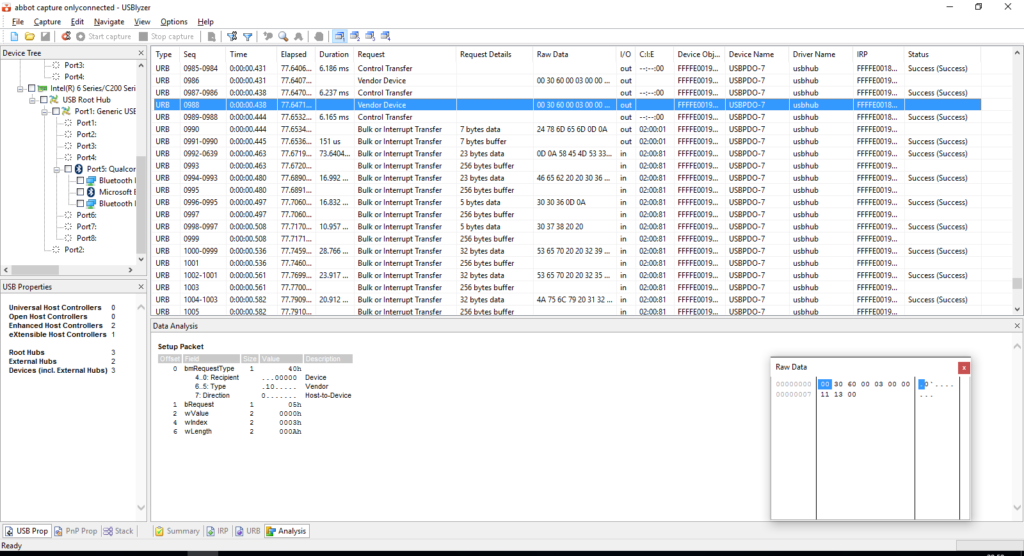
While the kernel has code to set up the config buffer, it obviously doesn’t have a parser, so it’s a matter of reading it correctly. The bRequest = 05h in the Setup Packet correspond to the TI_SET_CONFIG command in the kernel, so that’s the packet I need. The raw data is the content of the configuration structure, which declares it being a standard 8N1 serial format, although 0x0030 value set for the baudrate is unexpected…
Indeed the kernel has a (complicated) formula to figure the right value for that element, based on the actual baudrate requested, but reversing it is complicated. Luckily, checking the datasheet of the USB to serial conveted I linked earlier, I can find in Section 5.5.7.11 a description of that configuration structure value, and a table that provides the expected values for the most common baudrates; 0x0030 sets a rate close to 19200 (within 0.16% error), which is what we need to know.
It might be a curious number to choose for an USB to serial adapter, but a quick chat with colleagues tells me that in the early ‘90s this was actually the safest, fastest speed you could set for many serial ports providers in many operating systems. Why this is still the case for a device that clearly uses USB is a different story.
So now I have some commands to send to the device, and I get some answers back, which is probably a good starting point, from there on, it’s a matter of writing the code to send the commands and parse the output… almost.
One thing that I’m still fighting with is that sometimes it takes a lot of tries for the device to answer me, whereas the software seems to identify it in a matter of seconds. As far as I can tell, this happens because the Windows driver keeps sending the same exchange over the serial port, to see if a device is actually connected — since there is no hotplugging notifications to wake it up, and, as far as I can see, it’s the physical insertion of the device that does wake it up. Surprisingly though, sometimes I read back from the serial device the same string I just sent. I’m not sure what to do of that.
One tidbit of interesting information is that there are at least three different formats for dates as provided by the device. One is provided in response to the $colq command (that provides the full information of the device), one at the start of the response for the $xmem command, and another one in the actual readings. With exception of the first, they match the formats described by Alexander, including the quirk of using three letter abbreviation for months… except June and July. I’m still wondering what was in their coffee when they decided on this date format. It doesn’t seem to make sense to me.
Anyway, I have added support to glucometerutils and wrote a specification for it. If you happen to have a similar device but for a non-UK or Irish market, please let me know what the right strings should be to identify the mg/dL values.
And of course, if you feel like contributing another specification to my repository of protocols I’d be very happy!