You may remember that last year, when I wrote about my second COVID experience, I mentioned that my mother used a Whirlpool AP330W air purifier, and that she was unable to find a replacement filter when the filter’s life exhausted. At that point I also bought (and started using) one of those purifiers for the flat I live in London, hoping to figure out which filter they would work with.
The filter life expired in January this year, and before going onto AliExpress to order a filter that matched the shape and size of the one that came with the device – as a reminder from the previous post, neither the manual, nor the Whirlpool website, nor the filter itself, list any part number for replacement – I decided to take the device apart, to figure out if I could get a different model name to match to a filter.
And, well, to the surprise of nobody, that didn’t happen, but it confirmed my suspicion that Whirlpool has nothing to do with the manufacturing of this air purifier, and that the presence of their 6th Sense trademark on the device is just cheeky and nothing to do with any “sensing” technology that Whirlpool has been known for in the past forty years or so.
Besides the shoddy manufacturing (half of the screws throughout this machine were rusty, and I don’t believe this happened since I started using it), I found out that the bottom of the purifier had a block diagram of the device stuck to it. When was the last time you saw something like that on a large-scale commercial device? And I mean not because of right to repair laws.

What this block diagram showed clearly (if it was to be trusted, that is) is that there is no sensor for the filter itself. In my first post mentioning this device, I said it likely had a pressure sensitive plate, since the bottom of the filter holder is mounted on springs — but both the diagram and a quick screwdriver application showed that there is nothing connected to that bottom plate.
Since I’m not Bigclive, you won’t see me making a video of opening up the purifier, but I have to say that the construction is… not quite terrible, but cut corners in quite a few places. While I could get most of the device disassembled without the use of force (it’s either screwed-in, or push-fit, and is quite easy to open), half of the screws on it were rusted out. Given the device was kept in our bedroom, which up until very recently barely reached 37% humidity (I bought a new humidifier last month), I don’t think this has happened in our care.
The block diagram appears to be a reliable narrator in this case, for the most part. If you have any experience with looking into any such peripheral, you can probably already guess that the “Display Panel” is a bit more than just a display: it is actually where all of the logic for this device is implemented, with the “Operate Panel” being just the buttons and LEDs on top of the device.
The overall construction of the device is (unsurprisingly) a variation on the Corsi-Rosenthal Box — the device uses a cylindrical filter, rather than four flat filters, and it includes two (supposedly) UV-C LEDs for sterilization purposes. I have no access to a suitable tester, and have no intention to literally test it on my own skin to know whether these are effective, or only for show.
I’m also now quite sure that there is nothing in this construction that can identify what filter you have installed into it. Which means any 28cm cylindrical filter should work with it. The only sensor that could even register the filter would be the Hall effect sensor that is combined in a single board with a gas sensor module, but even that is far fetched, as its location is towards the back of the device, and appears more likely to sense whether you closed the small trap door to the slightly more complicated PM2.5 sensor module that appears to be light chamber based sensor (I’ll let Alec explain how those work — smoke alarms being just a very specific type of particle sensors).
Going back to the Display Panel, which appears to have all of the useful logic on it, has once again no marking at all to relate this device to Whirlpool, cementing my impression that this was a white label job, and one that didn’t particularly care about build quality.
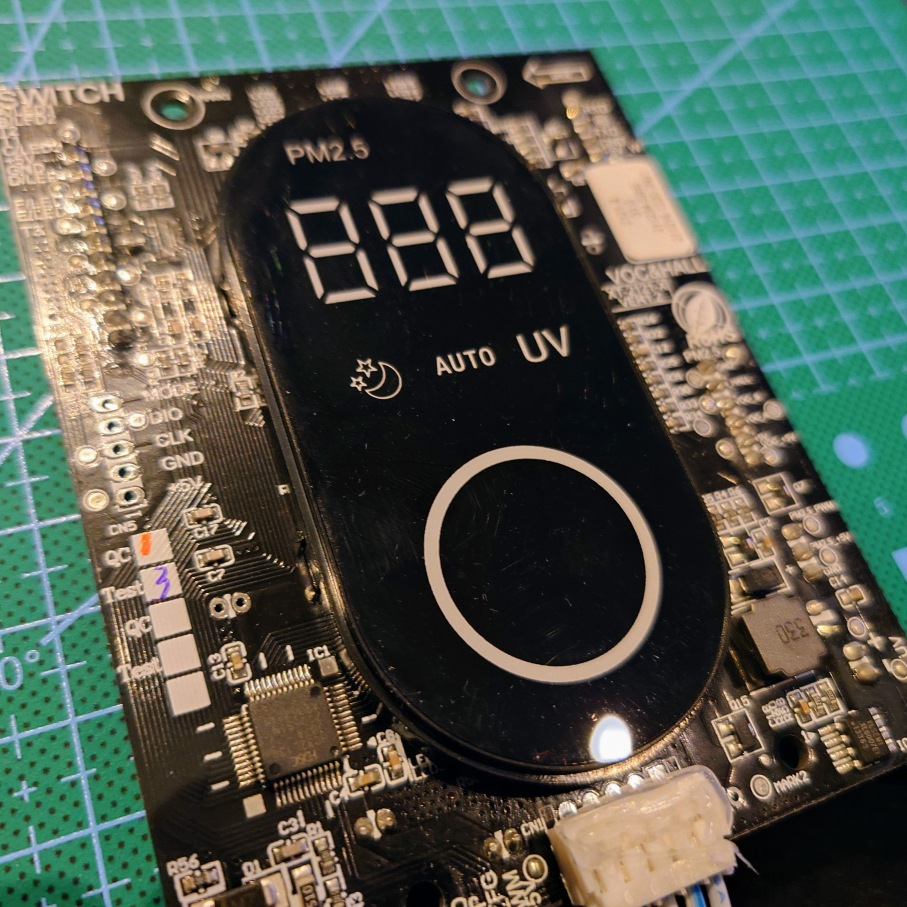
The good news when looking at this board, is that it provides access (on the back side, not pictured) to some kind of serial port — CN3 is marked with a 4-wires GND/+5 and RXD/TXD connectors. In addition to this, the non-populated CN5, which is barely visible on the left of that picture, appears to be a SWD (Single-Wire Debug) header (see Remote Debugging). Which means this board (and by extension this purifier) could be somewhat hackable, if you were so inclined.
The MCU on the device should be that one large-ish chip you see, which is a HC32L130J8TA. LCSC says they’re manufactured by HDSC, but I did find a datasheet for this MCU branded XHSC instead (also on the LCSC website.) It is unfortunately only in Chinese (which is not unusual.) But even without needing to go through Google Translate (or asking help from any of my Chinese-reading friends), it was easy to confirm that the device does indeed support SWD, assuming it is the right datasheet.
I have never heard of either of those two manufacturers, though. A quick Kagi search showed feature requests to the Klipper project, to support Anycubic 3D printers, that appear to use MCUs from the same manufacturer, and looking for the specific product line shows that HDSC has a GitHub Org, corresponding to Huada Semiconductors, that has been active in the last two months (at the time of writing.) It also shows that the MCU is supported by the Keil compiler, with a Device Family Pack coming from that very same GitHub Org. The org in turn references XHSC for as part of their SDK.
The SEGGER wiki shows a related HC32F460 device being supported by J-Link, and thanks to the GitHub Org above, I was able to confirm that pyOCD supports the HC32L130 just fine, coming with a matching SVD definition already. Which suggests I should be able to at least get to know the chip a bit more, though I have not done any hardware setup at the time of writing (for a multitude of reasons), so I’m not able to confirm this does work, whether the chip’s firmware is read protected or not, and even if I do manage to take a copy of the firmware, whether I can reverse engineer enough of it to find out why the filter replacement appears to not be working (I have a feeling by now that the routine is just not implemented, as they expect you’ll forget all about the device by the time the filter life is exhausted.) But once I have some more time to proceed with those investigations, I will hopefully have something more to say about this device.
For the time being, I would recommend you all to avoid this air purifier. unless you’re looking for a fun project. If you’re looking for something simple, not smart, not connected to anything, you may want to consider IKEA’s Förnuftig purifiers, or alternatively their Zigbee-controlled Starkvind. I bought one of the latter for the bedroom, to replace this deceiving one, which in turn was replacing a Dyson — IKEA filters are significantly cheaper, about as cheap as AliExpress for these cylindrical ones, and if you’re using Home Assistant with zigbee2mqtt, the integration is trivial.
If you can please excuse the product placement, I would like to mention Rowenta, a french brand that commits to making parts available for 15 years at a reasonable price and still manufactures some of their stuff in France (not the air purifiers but I appreciate the effort anyway).
Excellent article. I wish i head read this before buying mine! Were you able to source a spare filter? If so, a point inthe right direction would be most welcome, I’m going crazy trying to fine one!
I took would love to know. Mines giving an eye error now, but the 3 second press doesn’t seem to reset it as per the instructions. Potentially it’s because it’s at 2900 hour mark and not the 3000 hour mark. I’ll see how it gets on after it hits the 3000 mark, in terms of the filter itself, it looks great again after a quick hoover out, so no reason for me to buy a new one right now. But when I do if I get one that fits I’ll post a link here
Thank you, very useful. I just wanna buy a air purifier, and this one is on sale with a very very good price. Before the order, I want to make sure the cost of the filter and reseach all of the website(maybe exaggerate), can’t find it!!!! even GPT and Gemini can’t give me the answer. After reading your blog, I’m sure I won’t buy it, however cheap it may be.
If it could help I ‘ve found that supplier for the filter
https://mytoolswiss.ch/fr/climatiseur/5593-filtre-pour-purificateur-d-air-air-purifier-ap330w-c00848111-whirlpool.html
I mean, the problem is not to find the filter (though the price in there is higher than the purifier itself was.)
The problem is that the purifier might not actually have a way to report the filter as changed!