Not to be confused with Home Assistant on Windows.
Context
You may remember that I spent a number of weeks in the past months reverse engineering my air conditioning controller, so that both me and my wife could control it via our Home Assistant instance (and the connected voice assistants). One of the latest reasons added onto why it was worth embarking into that particular journey was well captured by Alec of Technology Connections in his video on home energy storage — while the video was released after I already made up my mind on the topic, he had shared the idea in passing in other videos and I did pick up on it.
Basically, having a way to configure ranges of acceptable temperatures for different times of day allowed us to keep the flat cooler even during the last British heat wave (not the harshest unfortunately, as I wasn’t done by then!) — when a lot of neighbours complained about their (identical) AC being unable to keep up with the heat. The “trick” for the most part has been asking the aircon to keep the temperature below 28°C even in the night. When it crossed over that threshold at six in the morning, the aircon just turned on in living room as well as my home office to keep it under control. It was glorious.
But then it got me thinking. When the heat wave hit really really harsh, part of the problem was the “winter garden” (balcony, you may call it), which is basically a “buffer room” between the flat and the outside wall of glass. Since we live fairly up high, and face East, in the morning the temperature of the winter garden has been particularly surprising. Going over 30°C becomes a daily occurrence in the summer, with 38°C happening multiple workdays — what I did not expect was that on the hottest weekend, the thermometers would reach their reporting limit, as they cap at 50°C! From squinting at the curve, my guess is that we hit the 56°C in our winter garden, and that scared me more than a little bit.
Now, the flat is supposed to have a way out: the winter garden has two vents at either end, a “Juliette balcony” (which basically means a door to a dozen-or-so floors fall, only prevented by a single pane of glass), and a pantograph window that is supposed to be operated through an electric keypad in the balcony itself. When we moved in, the only ventilation option we had were the two vents: the Juliette balcony door was seemingly locked, and the electric window refused to open.
Escalating the problem with the electric window to our landlord, who then escalated to building management, and building company, didn’t seem to make progress – eventually we had the window working for about a week, then it stopped again – so before the heatwave I thankfully asked our landlord for permission to call in a locksmith to open the Juliette balcony. Turns out, the door was not locked, but rather the lock itself was broken — either because it was seized and it required a lot of force to even open, or because it “cooked” over the years without being moved. But in either case, after a lot of money (for our landlord) later, we could open the door. But it was scary, because it’s a giant hole in the external wall, many floors up, with basically nothing stopping the stuff in your pocket from flying off if you turn too fast.
And as it turns out, we didn’t want to leave that Juliette door open, with all the connected risks, while we were out. And we didn’t want to be caught at home by the harshest heatwave London experienced in the past… forever? Thus, it pretty much cooked.
So I kept he wishlist item of having the electric window work with Home Assistant, being able not only to open and close it remotely, but having some automation making sure it would open if the temperature would reach certain levels. That wishlist item became closer to reality last month, as I ended up taking matters into my (insulated) hands.
We had emptied out the boiler room, to take some pictures for a quote for a water softener (don’t ask, that’s going to be another blog post), and as we were cleaning I could distinctly hear a faint buzzing from the box marked “Penagraph [sic] Windows”. I decided it was due time to power the thing off and check on it. Inside I found a Windowmaster WUC102, haphazardly enclosed in its plastic cover, and… very warm. Turns out the manual instructs you not to cover the device — but it had been enclosed in a sealed equipment box all this time, great work!
Controlling The Window
Floating next to the WUC 102 I found two relay modules — the wiring of which turns out to be… well, not stable. If you move them out of the way sometimes their cables don’t contact correctly, and now the keypad on the winter garden stops working, or can only send one of the two commands (open, or close). Some of our neighbours have history of having their window stuck open over the winter, which is not great. Despite the equipment box being able to support a DIN rail, and the relay modules being rail-installable, the box is too small to fit all of it, and was left in one of the most horrible wiring situations I’ve ever seen in my life, and I seen many.
On the bright side, the fact that we now knew how the window was controlled meant we could at least find a way to control it remotely: the WUC102 has three inputs with different priorities, which means you don’t need to change the wiring of the already-installed keypad to add a secondary input. As long as the keypad is left in the “auto” (idle) position, the second input can request the window to open or close. And to make things easier overall, the WUC102 also provides a separate 24V supply, which you can use to power up some of their thermostats and other gadgets… or a control board.
Unfortunately, the way you control the WUC102 is a bit… uncommon, at least for me. Instead of a positive signal on an input point, or a positive, neutral, negative voltage application, the way you open or close the connected window is by grounding the open, or close, input contact. This is the reason why there are two relays in the same box: the keypad they installed appears to send a positive (24V) signal on either the open or close wire — the relays then turn this signal into the right grounding of one or the other input.
After the whole HVAC journey, I had a moment of terror at the idea of having to build my own board again. I have a vague understanding of the work involved in it, namely two relays and an ESP32, but I really wouldn’t want to have to wire a custom board to the actual building. So I started looking around for relay control boards that you can use with Home Assistant.
When you start looking around, you mostly find people talking about Shelly or Sonoff. These are generally well supported by Home Assistant either with their original firmware or with ESPHome, but it turned out to be a bit of a challenge to find what I was looking for. The main problem is that the majority of their offering are solving a fairly usual set of problems: lights, fans, boilers, and so on. And as such, they can simplify everybody’s life by using “wet contacts” relays — relays that are switching the same line they’re powered by (usually, on the neutral contact).
Since the WUC102 requires you to ground the inputs, you need “dry contact” relays, that are basically electrically actuated single-pole switches. You wouldn’t think this would be hard to find, and indeed it isn’t if you’re looking for a single relay: the Shelly 1 is essentially it, and it has an exposed serial port to make it easy to flash ESPHome onto it, without much faffing around. Unfortunately, there’s no equivalent dry-contacts Shelly 2 — the Shelly 2.5 has wet contacts, and pretty much everything else Shelly appears to have is specific to lights or similar use cases.
Similarly, when you look at Sonoff, their DUALR2 has wet contacts. And if you even look outside of those two brands, you’ll find that pretty much every dual-relay board, whether it is WiFi or ZigBee, does not come in dry contacts mode. I have no idea why.
Sonoff does make one model that uses dry contacts: the 4CHPROR3, but do note that only the PRO version has dry contacts, and the option to supply DC power, and at first I didn’t think it would be the right choice for me due to the power supply. Since I don’t have a 220V connection available at hand, I would need to power the board from the 24V supply available from the WUC102 — and while the 4CHPROR3 does support DC input, the specifications and the silkscreen says that it supports a maximum of 23V — one volt lower than I have available.
So next I found this MHCOZY branded board which I do not recommend. This turned out to be clearly a SONOFF clone, which meant in theory it can run ESPHome, as it follows the near exact same ITEAD plans. Unfortunately it didn’t test-point the serial port, and given the very thin spacing of the pins, I failed at soldering cables that would give me a stable serial port, even after removing one relay to get a bit more space.
If you’re curious about this particular board, though, you may want to take a look at the video below, which was me Twitch-streaming while trying to understand how the board was wired in. In a poor man’s Bigclive, you can see me poking around with a multimeter while figuring out how the ESP module was wired up.
Originally I intended to solder the serial port and come back with the flashing and configuration of ESPHome, but I gave up after desoldering one of the relays, and then figuring out I had no idea how to set the ESP into boot mode so that esptool could speak to it.
Back to the Sonoff 4CHPROR3
So I eventually went for the Sonoff 4CHPROR3, which is comparatively “more expensive” by a tenner, but if I did go for it it would have saved me a lot of grief. While the Sonoff boards are not as hacking-friendly as the Shelly, with their exposed serial ports, it was just a matter of soldering five pins on the board (well, four technically was all it needed, but might as well solder all of them at once), that expose the serial port and power.
A few jumper cables later on a UART adapter, and you can put ESPHome on one of them. The project website even comes with a recipe for it! Note that the the ESPHome recipe states it’s for the R2, but it works fine with the R3 as well, I don’t think they changed the way the pins are presented, which would have been annoying for them just as much as for us who prefer our own firmware controls.
But not all of it is a clear winner, so let’s talk a bit more about the problems with using the 4CHPROR3…
First of all, while the PRO versions do support DC input, it does appear something is off with the range of voltages. In the Amazon specification page as well as in their documentation, it says that the DC input voltage is 9 to 23V, which is why I said earlier I set it aside from the options at first. This gets more confusing because if you look at the Amazon picture of the product, the silkscreen clearly reads «DC Input: 9-24V» in two places. I guessed that 1V wouldn’t be that much of a difference, and decided to test it anyway on the bench supply first.
The other problem is that, unlike the MHCOZY clone above, the DC input is not available as a screw terminal! It is instead on a barrel jack plug, center-positive (as in, the most common one, that is used by studio lights, TS-100, Western Digital drives, and so on. I actually have a lot of different options to supply those, because I found myself having so many different devices supplied by the same barrel jack, that I ended up ordering a few “squids” that can power multiple devices off the same brick.
To solve that part I ended up ordering a bunch of screw terminal adapters, because turns out that those have been handy in other situations before, particularly to allow me to supply random voltages through the bench supply, so it sounded like a good thing to stash up on.
Did the different voltage make a difference? I am not entirely sure, because one thing definitely felt awkward, but I’m not sure if it’s related to the voltage, ESPHome bring-up that slightly differs between R2 and R3, or something else entirely: the fourth relay triggers for a brief moment at a cold startup. Besides that, it appears the board is working fine, and not overheating or shorting, at 24V at all. Certainly it would have felt less awkward if the polarity of the plug was explicit on the silkscreen, and if they wouldn’t put a voltage rating that excludes a very common voltage in use for home automation!
A final note: exactly like for the MHCOZY above, the Sonoff 4CHPROR3 includes 433MHz remote control support. And exactly like the MHCOZY, this is totally independent of the ESP chip on board, which means you cannot disable it even when running your own custom ESPHome firmware, at least not from the point of view of being able to distinguish the 433MHz “remote presses” from the pressing of the local inputs. What to do with those input, though, is up to your firmware, so you don’t need to worry as much as crossed signals to the WUC102 as long as you configure your firmware to avoid that situation.
Wiring And Configuration
I ended up drawing the following diagram (for the electrician installing this officially), which shows how to wire up the two devices:
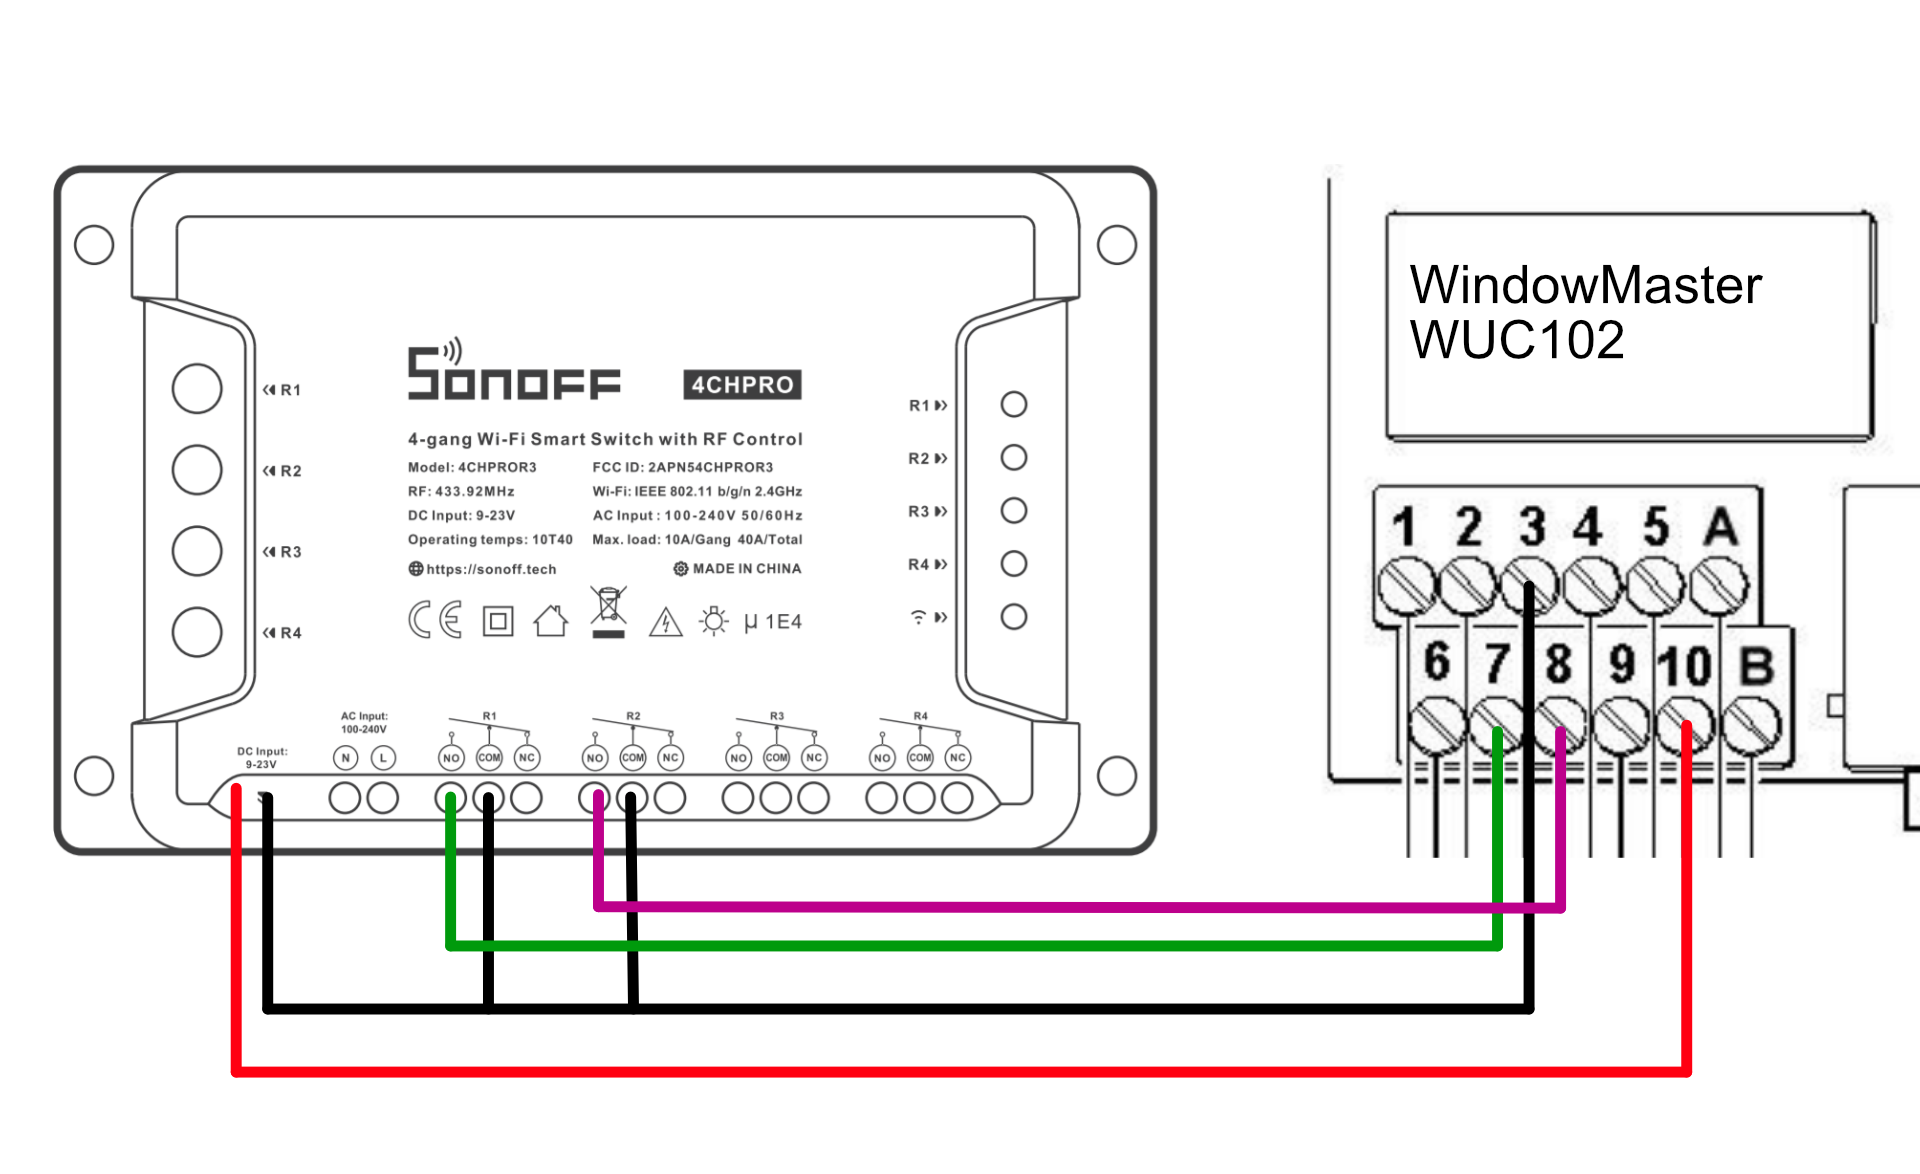
According to this diagram and the WUC 102 manual, R1 is “open” and R2 is “close” signal — but in reality, this does not appear correct, and indeed they are inverted, but it was definitely easier to just fix it in the firmware configuration for that. I don’t know if this is specific to the way our unit is wired to the actual window (it could be, lots of residents of the building have complained about the wiring being a problem), so if someone else has a WUC102 and finds that they are not inverted, please let me know. The good thing is, the WUC102 doesn’t care if you send a “close” signal while the window is closed or vice-versa.
Now, for the configuration things are fairly easy thanks to ESPHome’s support for covers, including documentation on how to send a timed input to one. The configuration I’m using is the following:
substitutions:
  node_name: "sonoff-wuc102"
  node_id: "sonoff-wuc102"
  device_verbose_name: "Sonoff WUC102"

packages:
  ha_wifi: !include common/ha-wifi.yaml

esphome:
  name: ${node_name}
  platform: ESP8266
  board: esp01_1m

# Device Specific Config
status_led:
  pin:
    number: GPIO13
    inverted: True

binary_sensor:
  - platform: gpio
    id: button_1
    pin:
      number: GPIO0
      mode: INPUT_PULLUP
      inverted: True
    on_press:
      - cover.open: "pantograph_window"

  - platform: gpio
    id: button_2
    pin:
      number: GPIO9
      mode: INPUT_PULLUP
      inverted: True
    on_press:
      - cover.close: "pantograph_window"

  - platform: gpio
    id: button_3
    pin:
      number: GPIO10
      mode: INPUT_PULLUP
      inverted: True
  - platform: gpio
    id: button_4
    pin:
      number: GPIO14
      mode: INPUT_PULLUP
      inverted: True

switch:
  - platform: gpio
    pin: GPIO12
    id: "relay_1"
  - platform: gpio
    pin: GPIO5
    id: "relay_2"
  - platform: gpio
    pin: GPIO4
    id: "relay_3"
  - platform: gpio
    pin: GPIO15
    id: "relay_4"

cover:
  - platform: template
    id: "pantograph_window"
    name: "Pantograph Window"
    open_action:
      # Cancel any previous action
      - switch.turn_off: relay_1
      # Turn the OPEN switch on briefly
      - switch.turn_on: relay_2
      - delay: 60s
      - switch.turn_off: relay_2
    close_action:
      - switch.turn_off: relay_2
      - switch.turn_on: relay_1
      - delay: 60s
      - switch.turn_off: relay_1
    stop_action:
      - switch.turn_off: relay_1
      - switch.turn_off: relay_2
    optimistic: true
    assumed_state: true
You can see that I've basically copied the configuration that is provided in the documentation, with the difference of changing the timing to 60s instead of the 1s — to be honest, I think this worked fine with 30s, but it just makes it easier when you look at the actual board in the boiler room.
The first two buttons (which control the closing and opening relays in the default configuration) have been reconfigured to send the open/close action instead, that way there's no risk of turning on both relays at the same time. As far as I can tell, you should be able to do the same with the original firmware and the Sonoff app in the "Interlocked" mode, but I much prefer a firmware I can control locally.
I left in the configuration the additional relays and the buttons, although they are not configured to do anything. I guess one day they may have good use for something — I would love if the boiler was using a controllable relay, rather than the stupid timer it uses now, but that's not going to happen while we rent, I think. For now, since they don't appear to cost me anything to keep there, they are in the configuration. I guess I could just comment them out until I need them and see if the firmware becomes smaller, but does it matter?
Automation and Results
Once all of this was done, the first obvious result was to have a reliable way to open the window. Remember that since moving in in October, we had no way to to open the window until September! The keypad only works for exactly one week in April, and that was about it. So even without any automation, and even if we only counted on the buttons on the actual Sonoff board, we already had a significant quality of life improvement.
The next level of quality of life improvement was the ability to open/close the window without going into the 40°C (and over) winter garden (although it has not reached those temperatures since we installed the Sonoff) — or the closer-to-0°C if we need to vent out humidity, which was the problem we (and a number of other residents of the building) face in the winter: bad insulation between winter gardens means we end up with fairly humid spaces, that can grow mold (this is my original reason to set up CGG1 monitoring in there!). The best solution is to open vents/windows for a little time each day to reduce the built up humidity, but it's really inconvenient to do that when it's freaking cold and you just woke up or are about to go to bed.
And all of this indeed was delivered by just installing the Sonoff. We could have gotten most of that already with the MHCOZY with the eWeLink app, to be honest — but that was not where I wanted to stop. Instead, I wanted to make it better, greener, and cheaper to keep the flat cool.
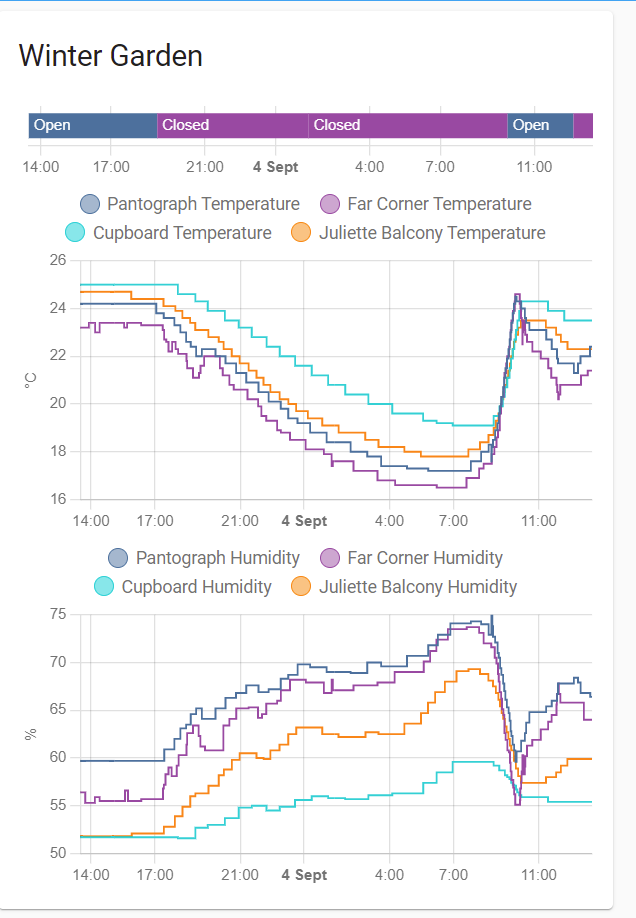
To understand what I mean, you need to know that the temperature monitoring on the winter garden showed that, any day that is even barely sunny, it gets warm extremely quickly, with a near-vertical graph (like shown in the picture here), but it can start dropping or at least not raising further, the moment you open one of the windows — we have noted that during the heatwave when opening the Juliette balcony window.
Now that we're closer to the equinox, it takes some time for the temperature to reach annoying levels, so we could just open the window as we wake up… but closer to the summer solstice, the temperature reaches 30°C when we're still fast asleep (neither of us is an early bird, and working from home didn't make it any better).
So I ended up setting up an automation rule that, if the temperature in the winter garden stays above 24°C for more than 10 minutes, it should just open the window for us. And as you can see from the graph above, it works like a charm: the temperature climbs up fast, reaching 24°C, but then drops down to a more reasonable 21°C fairly quickly.
You may wonder what's that graph line called "Cupboard" in there — that's a sensor attached inside a black cupboard that we put in the winter garden. The built up of humidity made it less likely we would want to use it for storing papers and board games as we originally intended, but we wanted to confirm just how bad it would be. Turns out, it's not as bad, but definitely not a good place to store humidity-sensitive content.
This automation is still not perfect. Starting with the fact that I did not configure it yet to close the window ever. That one is left up to us for now, because I don't have enough datapoints to know when it's a good time to close it without losing the benefit. I think at the very least I should make sure that if it starts raining it closes by itself — right now it does check the reported weather to decide if it's safe to open (being on the flight path to Heathrow does make that reliable enough, I find).
It also doesn't open if we're traveling — there's a "big red button" throughout all our automations that turns most of them off if we're not going to be in overnight. The reason for that is that most of them are meant to keep running if we're out during the day, because we still want to come home to a comfortable apartment. For the HVAC, we just have different ranges, and I think I'll need something similar for the window. A "passive thermostat" would probably also work for this, to be honest.
This is unlikely going to be a problem until summer anyway, not just because we wouldn't be traveling, but also the only case in which I would want to open the window if we were traveling would be if the temperature would reach 45°C or something along those lines. Because in that case, it would be a risk to the contents of the flat.
Final Thoughts
I'm surprised how hard it was to find a workable solution for this — particularly one that didn't come with more features than you need: ITEAD-based designs (like Sonoff) don't appear to have dry contacts control boards that don't also include the 433MHz commands. And Shelly, that appears to be a lot more hacker-friendly, does not appear to have any dry contacts options for more than one relay.
If you look around at all the various options, by the way, you'll find that all the instructions to flash ESPHome have huge, scary warning to never try to flash these control boards while installed. The reason for that is that none of them appear to provide isolated serial ports pins, which means you have the risk of getting a full line level AC on the pins, which is… possibly deadly.
Maybe Nabu Casa can start selling ready-to-flash control boards that don't penny pinch of safety hacking, it would be definitely something I'd be interested to pick up on myself.
It would also be interesting to see WindowMaster providing an ESPHome-flashable option to install with their WUC units — even though the WUC102 is discontinued, it does appear the protocol to speak with the new ones haven't changed, as the RJ port on the device is still present.
But for now, I'm just satisfied we can open and close the window without the hassles involved in the previous options.
Re “the fourth relay triggers for a brief moment at a cold startup”: that’s probably related to the GPIO pin that’s being used to drive the relay. The default pin function (according to ESPHome & Tasmota docs and the esp8266 datasheet) is MTDO (which I wouldn’t expect tobe generating any output?!) Maybe ESPHome is probing for SPI devices? A solution might be to move the pin function setup earlier in the code (before any debug output is generated). You could also try Tasmota to see if it does the same thing.